
Walking Floor Slat Replacement for Fleet Shops
Swapping every slat at a fixed birthday is the most popular advice in this trade, and it's usually wasteful. Floors don't wear evenly, cargo doesn't treat every trailer the same, and a calendar can't tell you which end of a slat still has useful metal. Treat walking floor slat replacement as a measurement decision, not a shopping list. Mark each slat rotate, plate, or replace from what your gauge finds at the discharge end, and you'll stop scrapping good front sections while catching bent or cracked planks before they bind a loaded trailer.
Table of Contents
- Rotate, Plate, or Replace by Measured Wear
- Tools, Parts and Slat Specs to Record
- How to Replace Walking Floor Slats
- Aluminum Welds, Fasteners and Wear Plates
- Hydraulic Checks Before the Trailer Rolls
- Recurring Inspection and Load Log
- When to Send the Slat Job to a Shop
Rotate, Plate, or Replace by Measured Wear
A fixed load count isn't a lifespan. It's a prompt to stop, empty the trailer, and measure. The KEITH Running Floor II maintenance manual states that floor slats should generally be rotated or replaced after approximately 3,000 loads, although the material being hauled can change that interval. That same guidance says to rotate the flooring end for end when wear at the rear exceeds three-quarters of the original slat thickness, and to fit replacement slats if the floor has already been rotated.
That distinction matters in the yard. Wait only for slow unloading or a visible hole and you've already lost the chance to use the unworn end. Replace a full set because the counter hit a round number and you may discard slats that still measure within a workable range up front.
What to Record Before You Decide
Walk the empty floor with calipers or a thickness gauge, a marker, and a sheet that follows the trailer number. Record load count, cargo type, and remaining thickness at the discharge end, mid-floor, and front of each slat. Note which end has already served at the rear if your history shows a previous rotation.
Compare ends, not just averages. A slat can look acceptable in the middle while the rear is knife thin where aggregate, glass, demolition debris, and wet organics scrub it on every unload. Those loads shorten any planning interval and concentrate loss where material accelerates out the doors.
Practical rule: Don't order parts from the average thickness. Order from the worst measured point and the slat's rotation history.
Then look past thickness. A bent, cracked, or impact-damaged slat doesn't get rotated just because the gauge reads well elsewhere. Loose or missing floor bolts, worn bearings above the tires, and damaged drive shoes or cross-drive tubes also move a job from watch to act now, because a straight new plank still fails early on a bad drive.
Mixed floors need the same discipline. If you replace only some planks, the replacements must match profile and finished height. A tall new slat beside worn neighbors changes how the load bears across the group, opens seal paths, and can make one section drag while the others travel cleanly.
Rotate, plate, or replace by what you measure
| Condition found | Action | Planning note |
|---|---|---|
| Rear wear over three-quarters of original thickness, never rotated | Rotate slat end for end | About 3,000 loads is the OEM guide, not a hard life |
| Floor already rotated once | Replace the worn slats | A second flip is not the manual's option |
| Wear mainly in the final 10 feet, profile still straight | Fit a rear aluminum wear plate | Reported repair often under $1,000; weight on about 25 percent of the floor |
| Bent, cracked, or impact-damaged slat | Replace or repair now | Do not wait for the load-count benchmark |
| Loose bolts, worn bearings above the tires, bad shoes or cross-drive tubes | Repair those parts with the slat work | A new slat on a bad drive fails early |
| Only some slats replaced, heights do not match | Match profile or replace the mismatched group | Height steps cause binding and seal leaks |
| About five years in abrasive service | Inspect the discharge zone separately | Five years is a planning benchmark, not a universal interval |
Mark every slat before anyone calls the parts counter. I would rather spend twenty minutes chalking R for rotate, P for plate, and X for replace than discover mid-job that a supposedly reusable plank is cracked at the shoe or already spent its second life at the rear.
Tools, Parts and Slat Specs to Record
Spec the system, not the trailer length. Two trailers with the same body length can run different slat counts, drive groups, profiles, and thicknesses. If you order by length alone, you'll own planks that don't sit under the bearings or don't match the drive that has to move them.
Build a One Page Spec Sheet
Count every moving slat and identify how the groups are driven. A Commercial Motor moving floor guide states that for roughly 30 years the standard walking-floor arrangement had used 24 independently moving slats and describes a 2003 all-steel demolition system with nine heavy slats driven by nine hydraulic cylinders, with thickness specified from 1/8 inch to 3/4 inch.
Record original thickness if you can find it, then remaining thickness at the rear, mid-floor, and front. Write down aluminum or steel and the cargo that justifies it. Aluminum suits lighter duty work. Steel belongs where demolition or abrasive waste consumes aluminum before the fleet gets value from the weight saving.
Check how each plank connects to its drive. A bolted shoe needs the right hardware and a torque wrench. A welded channel needs support, filler, and someone who can control heat in aluminum. Match the original arrangement instead of converting one group because a part happens to be on the shelf.
Also inspect what's around the slat. Bearings above the cross-members, sidewall seals, bolt holes, and drive channels decide whether the replacement runs straight. I'd stage lockout and tagout hardware, wheel chocks, mechanical cylinder blocks, calipers, and a torque wrench before removal starts, not after a slat is half out.
For scale on parts money, a 2025 UK listing from Newton Trailers priced a KEITH V9 alloy slat at £1,046.84 per unit. Treat that as a reference only, not your quoted price, but it shows why rotating or plating sound slats beats casually ordering a full set.
Tools, Parts and Spec Checks Before Ordering
| Item | What to record or stage | Reference value |
|---|---|---|
| Slat count and groups | Count moving slats and drive groups | About 24 slats was a long-running standard; a 2003 demo layout used 9 slats and 9 cylinders |
| Thickness | Original and remaining thickness at rear, mid, and front | Heavy systems specified from 1/8 inch to 3/4 inch |
| Material | Aluminum or steel, and cargo type | Aluminum for lighter duty; steel for abrasive demolition or waste |
| End position | Gap at doors and at the front wall | About 1 inch inside doors and about 9 inches from front wall on a 6-inch-stroke layout |
| Drive connection | Bolted shoe or welded channel | Match the original; support before any weld |
| Bearings and seals | Bearing condition and sidewall clearance | Correct with the slat or the new plank wears immediately |
| Removal tools | Lockout/tagout, chocks, cylinder blocks, calipers, torque wrench | Required before removal |
| Welding kit | Aluminum-rated welder, filler, support jig | Only if a channel or wear plate is welded |
| Estimated labor time | Hours per slat or per floor | Time the first marked slat, then plan the remaining slats from that recorded rate |
| Reference parts cost | Price per slat | 1,046.84 pounds per KEITH V9 alloy slat (2025 UK listing, reference only) |
Finish with a sheet a parts person can act on without calling back for basics. If the count, profile, material, thickness, end position, or drive connection is blank, you're not ready to order.
How to Replace Walking Floor Slats
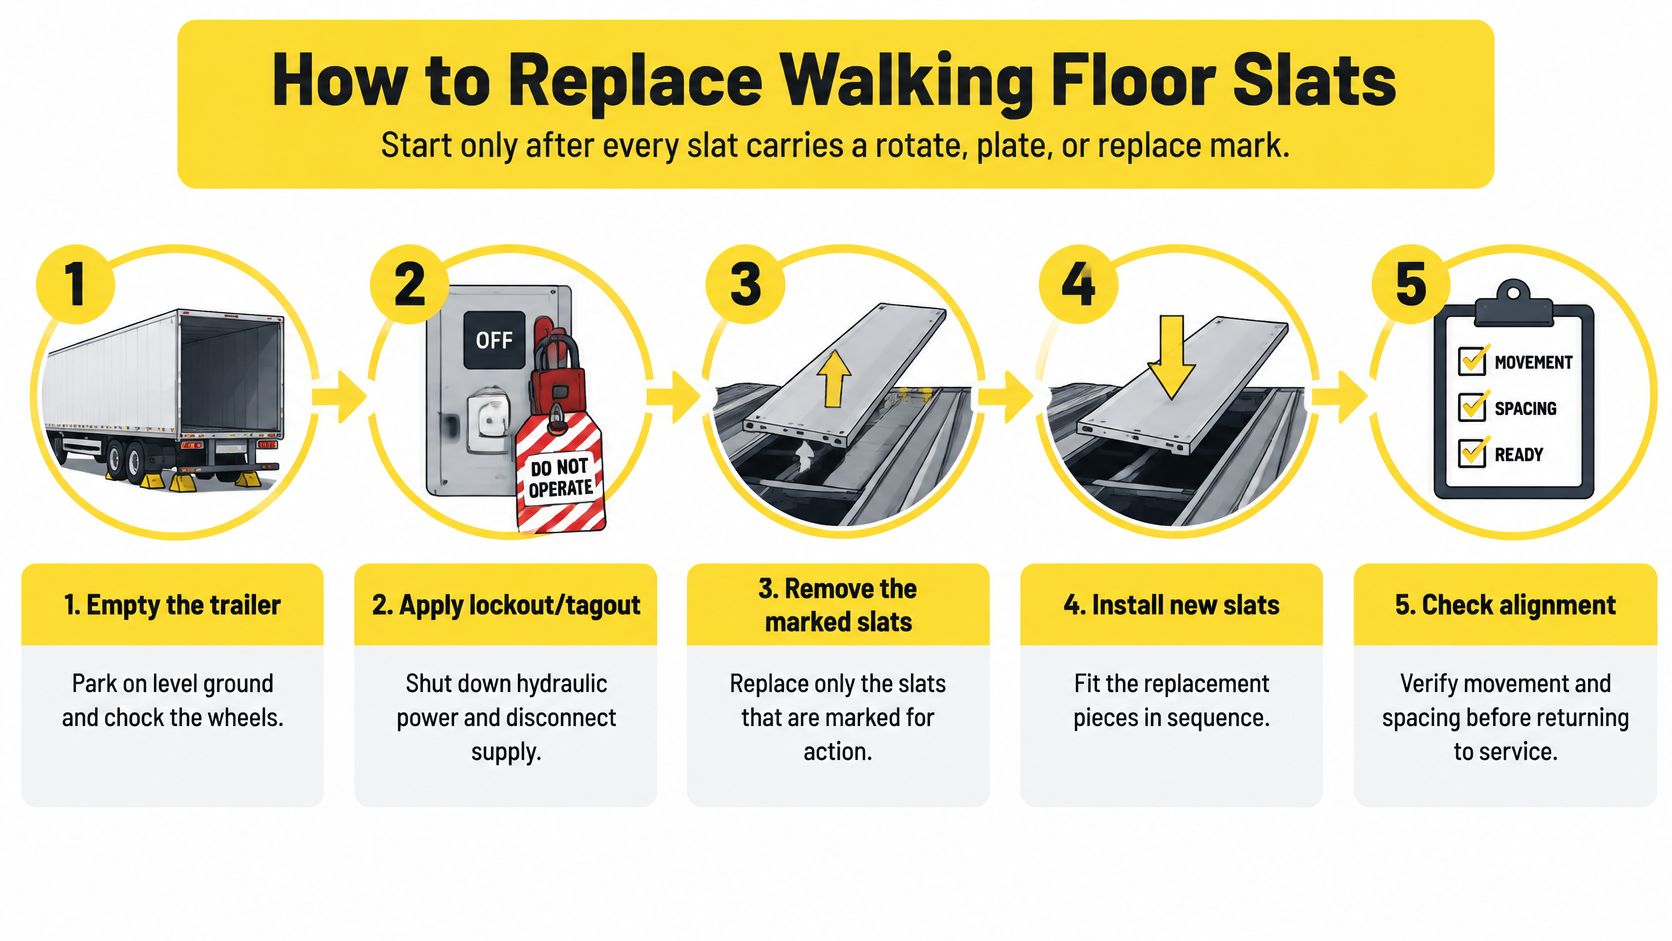
Start only after every slat carries a rotate, plate, or replace mark and the spec sheet is complete. The KEITH V-FLOOR installation manual specifies collapsing the cylinders toward the discharge end and blocking them before sliding slats into position, and its 6-inch-stroke layout places the slat approximately 1 inch inside the doors and about 9 inches from the front wall. The same procedure sets the slat ears beneath the J-bearing, then reconnects the drive channel or shoe and verifies alignment.
Controlled Removal and Fitting
- Empty and secure the trailer: Park on level ground and chock the wheels, because a floor that creeps on a slope changes clearances while you're measuring them.
- Isolate hydraulic power: Apply lockout and tagout, disconnect supply, and mechanically block the cylinders. Hydraulic pressure alone isn't a safety device while hands are near shoes and seals.
- Collapse and block the cylinders: Bring them toward the discharge end and leave the blocks in place before any slat slides, so a group can't shift under a loose plank.
- Mark group and shoe position: Number each slat, its drive group, and its shoe or channel before uncoupling. Returning a plank to the wrong drive creates timing and alignment problems you didn't have before.
- Slide the marked slat out: Uncouple the shoe or channel and draw the plank clear in line. Don't pry it over a bent bearing, since that can spring the profile and turn a reusable slat into scrap.
- Check the replacement against the body: Confirm profile, length, and end position before it goes fully home. A plank that's too long can strike at the doors or front wall at full stroke.
- Seat the ears and reconnect: Put the slat ears beneath the J-bearing so the profile can't lift, reconnect the shoe or channel, and sight the full length for alignment before anyone restores power.
- Fix the sub-deck faults in the same visit: Replace bent bearings, secure loose floor bolts, and correct distorted channels now. Skipping them is the usual reason a new plank starts wearing like the old one.
- Route weld work correctly: If a channel or wear plate needs welding, use the support and stitch discipline for aluminum rather than running a continuous bead in place.
A smooth hand slide on the shop floor doesn't prove the group will stroke cleanly under hydraulic power. Keep people clear of shoes, seals, and the rear door pinch points until the empty cycle is finished.
Work one marked slat at a time unless the whole group is coming out for a matched set. That keeps a known good neighbor in place as a height reference and makes it obvious when a replacement sits proud, low, or twisted before the drive is reconnected.
Aluminum Welds, Fasteners and Wear Plates
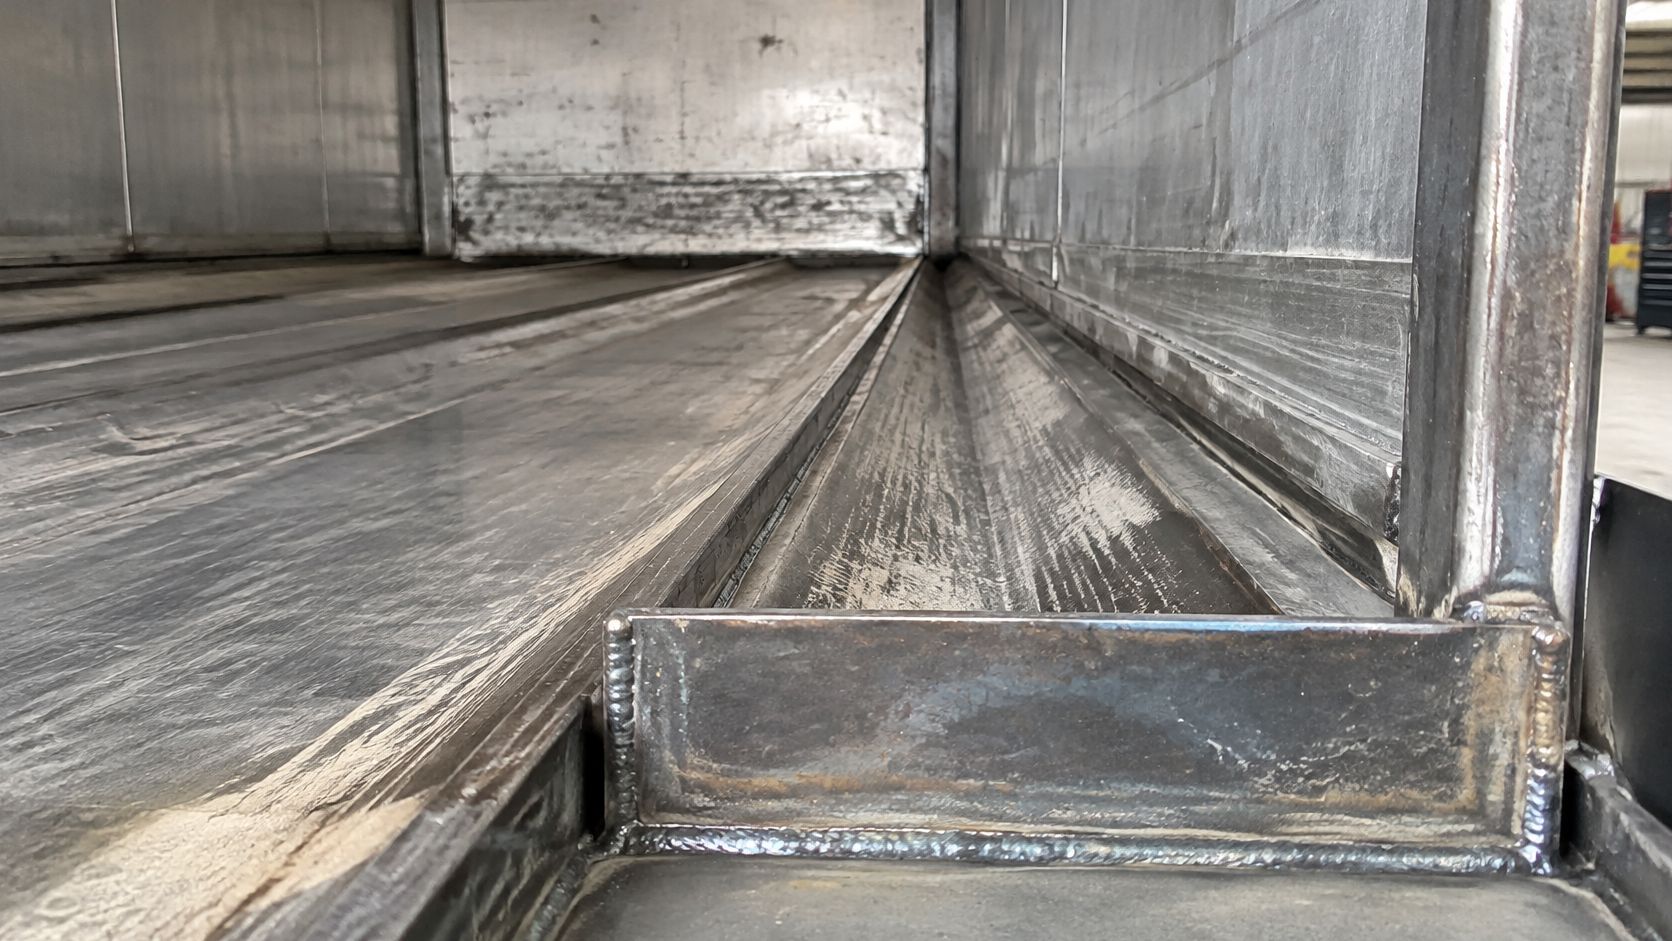
Rear abrasion, not uniform wear, drives most of these jobs. The Recycled Materials Association reported that operators typically replace slats about every five years and that the final 10 feet wears fastest because material experiences concentrated friction as it exits. Its documented alternative is welding 1/4-inch aluminum wear plates onto rear aluminum slats, adding weight to only 25% of the floor, with the reported repair cost likely below $1,000.
That's the right candidate for plating. Mid-floor section remains sound, the profile is straight, and the damage is a wear scar at the exit. When that sacrificial plate is consumed, you replace the plate rather than the complete slat or floor.
Support First, Then Stitch
Support the slat and any drive channel so the section can't pull while the bead cools. Aluminum moves with heat, and a thin plank that leaves the jig bowed won't become straight because the shoe bolt is tight. It'll ride high, drag at the bearing, or stand proud of its neighbors.
Clean the oxide film back to bright metal at the joint, keep the arc moving, and stitch weld in controlled segments. Let each stitch cool before adding the next. A long continuous pass puts too much heat into one line, bows the slat, and can distort the channel the drive depends on.
- Welded channel: Clamp and support around the channel, stitch in short runs, then check for twist after cooling.
- Rear wear plate: Keep the finished surface flush with neighboring slats so cargo doesn't snag and one cylinder doesn't take the extra drag.
- Bolted shoe: Use the specified fastener and torque. Don't substitute a weld because the bolt hole is worn.
- Bent or cracked plank: Replace it. A plate over structural damage hides the fault and adds a step to the floor.
After cooling, sight down the slat for twist, confirm the ears still sit under the J-bearing, and run a straightedge across adjacent planks. If the plate stands proud, dress or refit it before cycling the floor. That small lip matters with wet waste and aggregate because material catches there on every stroke and concentrates load on one drive group.
I wouldn't plate a slat that's already been rotated and is thin at both ends just to delay ordering. Plating buys life from a sound profile. It doesn't restore section to a plank that's structurally finished.
Hydraulic Checks Before the Trailer Rolls
Don't release the trailer because the new planks slid into place by hand. Restore power only with the floor empty and everyone clear, then run a full unloading stroke and a full loading stroke. Watch each group start, travel, and finish. They should move in sequence without a pause, shudder, or one slat trailing behind.
Read the Empty Cycle Like a Test
A lagging group or rising pressure points to a mechanical cause first. Check for a bearing that's bent, a wear plate sitting high, a shoe reconnected out of position, a twisted channel, or end clearance that's too tight at full travel. Clean debris from the sub-deck before blaming the pump, because packed glass and aggregate can knock and drag exactly like a hydraulic fault.
Walk both sidewalls while a second person cycles the floor. Fixed and moving edges need enough seal contact to hold wet waste and organics without grinding the new plank. A fresh rub mark after a few empty strokes tells you more than a visual gap check with the floor parked.
If direction is wrong or one group never moves, stop adding slat work and diagnose the drive. The Keith® Walking Floor® Control Valve controls the forward and reverse movement of the floor slats, so valve response and cylinder movement have to be proven before you chase profile fit. Keith® Walking Floor® bearings are available for 3.5-inch and 6-inch slats, which is another reason the fitted bearing has to match the recorded profile during this check.
Write down the result while the trailer is still in the bay. Note pressures if your test setup records them, any clearance adjustment, any fastener you retorqued, and whether both directions completed cleanly. A note that says only tested OK won't help the next shift when a driver reports a pause under load.
The paperwork is part of the release gate. FMCSA driver vehicle inspection report guidance states that a driver may not operate a commercial motor vehicle unless satisfied that its parts and accessories are in good working order, and reported trailer defects must be certified as corrected or as requiring no correction, including on the carrier's copy when the trailer is separated from the tractor.
Put the slat repair, empty cycle result, and defect closeout in the trailer file before dispatch. That packet is the handoff between the shop, the yard, and the driver who's expected to accept the unit.
Recurring Inspection and Load Log
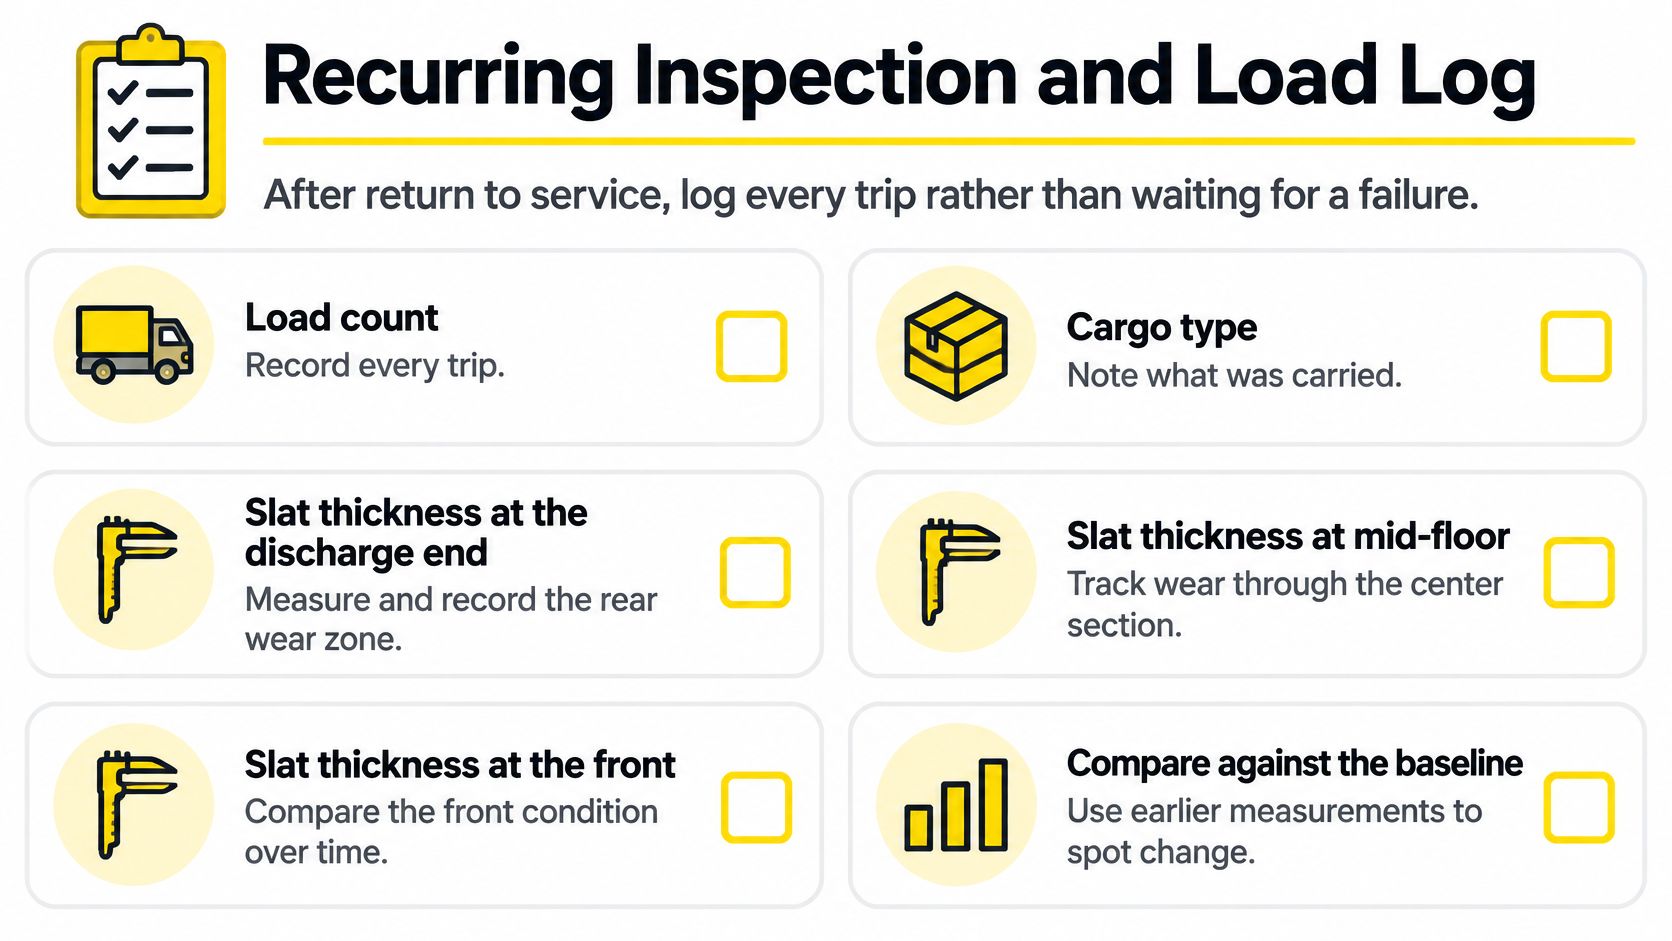
After the trailer returns to service, log the work it does. The KEITH Running Floor II owner's manual gives approximately 3,000 loads as a general guide for slat rotation or replacement and calls for pressure washing the drive unit, sub-deck, and slats at least twice yearly, or quarterly where practical. It also calls for checking loose or bent slats, drive shoes, cross-drive tubes, seals, floor bolts, and barrel-clamp and floor-bolt torque.
Keep the Log on the Trailer Record
Give each unit its own running sheet. Tractors change, drivers change, and a trailer that relies on someone's memory ends up inspected only after it fails to unload.
- Load count: Record every trip against the trailer number, not the tractor.
- Cargo type: Separate clean recyclables from aggregate, glass, demolition debris, and wet organics.
- Thickness points: Measure discharge end, mid-floor, and front, then compare each point with its previous reading.
- Fasteners and drive parts: Check floor bolts, barrel clamps, shoes, and cross-drive tubes for looseness or damage.
- Seals and sidewalls: Look for leakage paths, fresh rub marks, and gaps that widen as the floor strokes.
- Cleaning date: Record when the drive unit and sub-deck were washed out, not just when the body was rinsed.
Shorten the interval for abrasive service. A trailer hauling dry, light material on a predictable route doesn't consume rear slats at the same rate as one moving wet waste or crushed material all week. Your own load log will show that difference if you record cargo with the count.
Shop habit: Measure a plated slat at the plate itself. A thick mid-floor reading says nothing about how much sacrificial metal remains at the exit.
Don't wait for a rattle to torque fasteners. Cyclic movement works hardware loose, and a loose slat damages its neighbors before it comes fully free. Put torque checks on the same visit as thickness readings so the floor is already empty and accessible.
The payoff is a smaller next outage. With load counts, cargo history, and three point measurements on file, the next crew can target the discharge zone, one worn shoe, or one group of planks instead of parking the trailer for another full floor diagnosis from scratch.
When to Send the Slat Job to a Shop
Keep the job in house only while your crew can measure the floor, lock out the hydraulics, support the work, and prove both directions on an empty cycle. That's a fair limit for a straightforward rotation, a rear plate on a straight aluminum slat, or a like for like plank with sound bearings and shoes.
Send it out when several groups bind after fitting, one group won't move, or the fault moves from the planks into a cylinder or control valve. Aluminum cracked into a drive channel is also shop work, because the repair needs controlled welding and alignment, not a bead laid over a moving joint in the yard. The same applies when the floor needs a matched slat set with bearings and your operation can't absorb days of trial fitting.
Brothers Truck Trailer Repair and Welding Corp. offers Walking Floor work, aluminum welding, fabrication, maintenance, and parts, so diagnosis doesn't have to restart when the trailer leaves your yard. Our Walking Floor services include replacement of worn or damaged floor slats and expert diagnosis and repair of hydraulic systems, offered with fast turnaround times to minimize downtime.
Bring the paperwork that makes the job faster. Send the spec sheet, the load log, your rotate, plate, or replace marks, and notes from any failed empty cycle. Include which group lagged, where it rubbed, and what thickness you measured at each end. Measured history beats a phone description of a floor that acts funny.
Leave with a simple standard your whole crew can apply. Rotate a straight slat that still has a sound unworn end. Plate a rear only wear scar on a sound profile. Replace a bent, cracked, or previously rotated plank, then close the inspection paperwork before the next load goes on.
If your measurements point to worn slats, a binding drive, or aluminum damage beyond a yard repair, Brothers Truck Trailer Repair and Welding Corp. can handle Walking Floor slat replacement, hydraulic diagnosis, aluminum welding, fabrication, maintenance, and parts support in one shop visit. Bring your spec sheet, load log, and slat marks so we can start from the condition you found instead of repeating the inspection. Visit Brothers Truck Trailer Repair and Welding Corp. to discuss the trailer and get it scheduled.

Aluminum trailer crack repair for fleets: classify the crack, inspect the full path, weld sound metal, and know when a shop should do it.

Standard trailer ball sizes with rated capacities, SAE load classes, torque values and a fit checklist so you match ball, shank and coupler correctly.

Trailer brake inspection steps, pushrod limits, pressure specs and pass-fail criteria for fleets and owner-operators, with the checks most often missed.