Aluminum Trailer Crack Repair for Fleets
The Walking Floor trailer is loaded, dispatch needs it moving, and the same rail has cracked again weeks after someone ran a neat bead over it. An aggregate trailer with a split beside a crossmember puts you in the same position: decide whether you're looking at a contained panel defect or a load-bearing member that shouldn't leave the yard.
Aluminum trailer crack repair starts with the failure mechanism, not the welding machine. For fleet maintenance, the quality test is whether the repair survives loaded service without moving the crack to the next weld toe, bracket, or doubler end.
Table of Contents
- Classify the Crack Before You Weld
- Inspect the Crack and the Hidden Side
- Hold a Crack Until the Real Repair
- Tools, Materials, and Safety Checks
- Weld the Crack Out and Stop the Comeback Causes
- Decide When the Trailer Goes to a Shop
Classify the Crack Before You Weld
The visible line may be the exposed end of a longer fatigue path. Rough roads, uneven loading, floor operation, and unsupported flex repeatedly strain the same joint. Closing the opening doesn't correct those conditions.
Aluminum has no true fatigue endurance limit, so repeated loading can eventually cause cracking even at relatively modest stress. The practical distinction is between an isolated defect and a member whose geometry, alignment, or loading keeps producing damage, a concern discussed in the American Welding Society's aluminum fatigue discussion.
Choose the repair class before choosing filler
Aluminum trailer crack disposition by location
| Location | What it usually means | Repair class | Back in service |
|---|---|---|---|
| Nonstructural skin or panel | Isolated split, low load | Stop-drill and same-alloy patch, then weld when scheduled | Limited load until permanent repair, only after a safe-service assessment |
| Floor sheet or light floor support | Local fatigue or impact | Remove crack fully, weld, add tapered doubler if the support carries load | After dye-penetrant check and a controlled loaded reinspection |
| Side rail or crossmember, first crack | Load-path damage | Sleeve or doubler past the damage, or section replacement | Only after geometry check and approved procedure |
| Repeat cracks in one rail, hanger, tongue, or axle area | Broader fatigue or misalignment | Section replacement or engineering review, not more filler | Not until cause and square are corrected |
| Suspension, kingpin, landing gear, or axle attachment | Primary structure | Engineered repair or replacement with documented approval | Manufacturer or engineering release required |
| Cluster of cracks within a short span | Systemic flex or overload | Treat as one fatigue problem, map all tips, redesign or replace the member | No if only the longest crack is welded |
These are disposition categories, not blanket permission to operate a damaged trailer. A panel that braces another member or retains cargo may be more consequential than its thickness suggests.
Read the weld toe and the surrounding geometry
In tested 5083 and 6005 aluminum structural joints, fatigue cracks started at the weld toe; the TWI review of welded-aluminum fatigue assessment also reports that seawater exposure reduced fatigue life to approximately one-third of life in air and lowered fatigue strength by about 25%. Those exposure results aren't a trailer-life prediction, but they justify closer inspection where road salt, coastal moisture, and wet cargo reach stressed joints.
Look for abrupt section changes, undercut, oversized weld reinforcement, and unsupported spans. Check whether the trailer is square rather than assuming the crack itself explains the problem.
Practical rule: A larger patch isn't automatically a stronger repair. A stiff, square-ended doubler can transfer the fatigue problem to its termination.
For Walking Floor and aggregate equipment, classify nearby cracks together. Repairing each line separately can leave the shared flex or alignment problem untouched.
Inspect the Crack and the Hidden Side
Don't base the work order on the bright line visible from the aisle. The misses that cause comebacks are often behind a bracket, on the opposite wall of a tube, or beside the next crossmember.
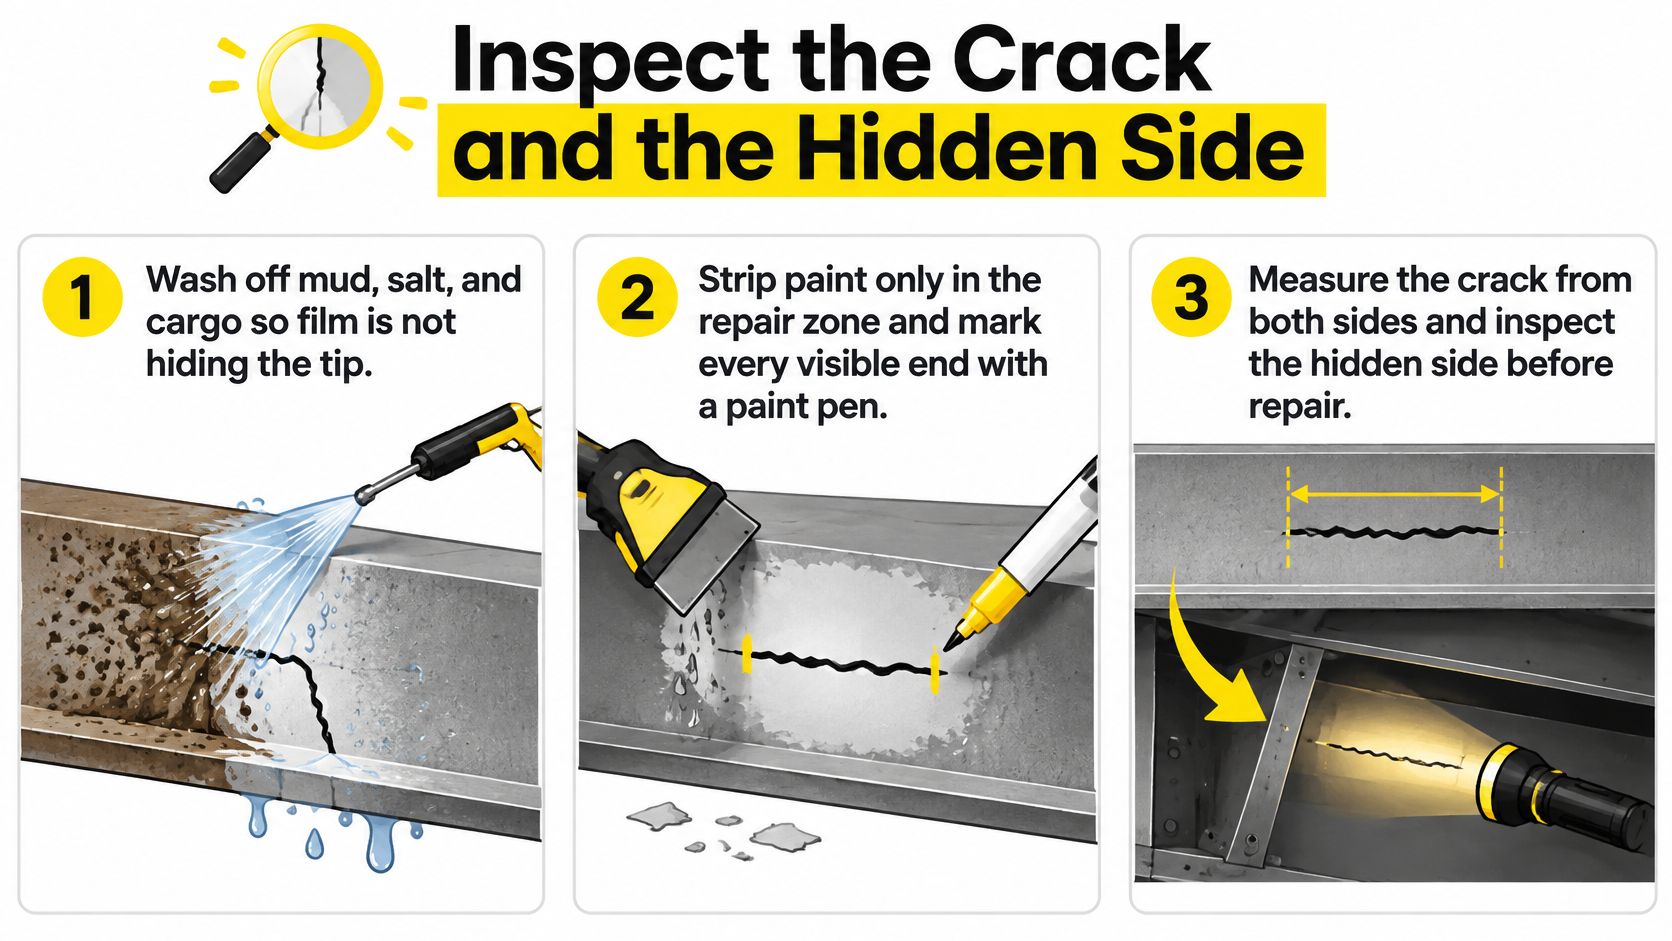
Use the inspection sequence to expose the defect before anyone changes its shape.
Run a documented bay checklist
Wash off mud, salt, and cargo so film is not hiding the tip. Remove packed material from ledges and bracket pockets, not just the exposed face. Let the area dry before judging the crack.
Strip paint only in the repair zone and mark every visible end with a paint pen. Keep the marks outside the eventual weld preparation. Photograph the unground defect with a scale so the original condition remains available after metal removal.
Measure the crack from both sides and inspect the hidden side before repair. Identify the member, its orientation, and the direction the crack follows. On a Walking Floor trailer, distinguish floor-sheet damage from a support defect beneath the slats.
Expose the opposite wall of any box rail or tube. Use lighting, a mirror, or suitable internal viewing equipment where access permits. If the far wall can't be assessed, record the limitation rather than marking the member clear.
Search for sister cracks. Inspect adjoining weld toes, fastener holes, bracket ends, and neighboring floor supports. A second small indication can change the disposition from a local weld repair to member replacement.
Use dye penetrant when a tip fades into the surface. Follow the kit's cleaning, dwell, and developer instructions. Magnetic-particle testing doesn't apply to aluminum, so a magnetic-particle check cannot establish that an aluminum member is crack-free.
Confirm material and alignment. Use build records, material markings, and manufacturer information to establish the alloy and original section. Measure thickness and check trailer geometry against appropriate reference points, not a damaged edge.
Make the handoff usable
Record the crack location, measured length, hidden-side findings, nearby defects, and evidence of an earlier repair. Include photographs of bracket interfaces and any areas that remain inaccessible.
Separate observation from diagnosis. “Crack beside crossmember weld, opposite wall not accessible” gives the next shift useful information; “needs welding” doesn't.
Also record what was happening when the defect appeared: loaded travel, unloading, impact, or an alignment complaint. That information helps the repair lead decide whether the job needs welding alone, fabrication, replacement parts, or a Walking Floor system check.
An uninspected hidden face is an open inspection item, not proof that the damage stops at the visible wall.
Stop the inspection-to-welding handoff if the defect reaches a primary attachment your crew isn't authorized to repair. Secure the unit and obtain the appropriate repair disposition before grinding away evidence.
Hold a Crack Until the Real Repair
A Friday-night split in nonstructural sheet may be containable. That doesn't make the trailer repaired, and reducing speed or payload doesn't make a structural crack acceptable.
For short sheet-metal cracks, FAA advisory circular AC 43.13-1B describes stop-drilling approximately 3/32-inch or 1/8-inch holes at the extreme ends to reduce stress concentration. That's aircraft repair guidance, not a commercial-trailer operating authorization; the trailer's actual condition and approved repair requirements still govern.
Contain skin damage without disguising it
Locate the complete split before drilling. A hole beside the tip doesn't blunt the tip, and drilling blindly can remove useful metal without controlling the defect.
A temporary skin patch should use compatible material, normally the same alloy and thickness, with rounded or multi-sided geometry and a planned fastener pattern. Keep it clear of moving floor components, hydraulic lines, wiring, and cargo-contact hazards.
- Confirm its role. Verify that the sheet isn't part of a critical load path or necessary cargo containment.
- Control operation. Apply any movement, load, and speed restrictions established by the responsible maintenance authority.
- Set an expiry. Tag the temporary repair and schedule its permanent disposition rather than leaving it to the next routine service.
- Preserve the record. Note mileage, photographs, crack location, and who authorized the temporary measure.
Stop-drilling alone is temporary containment. It doesn't restore the section or eliminate the conditions that produced the split.
Know which patches must stay in the yard
Don't screw a cover plate over a rail, suspension hanger, kingpin area, landing-gear mount, or axle connection and send the trailer back to work. Those locations require a structural decision, not a weatherproof cover.
A sleeve or doubler needs an engineered load-transfer arrangement, adequate extension beyond damaged metal, and an attachment procedure suited to the alloy and thickness. A convenient piece of plate isn't a substitute for that design.
Containment boundary: If you can't locate the tip, confirm the member's role, or establish a safe temporary disposition, park the trailer.
Reject the apparent shortcuts: welding through paint or oil, burying an unremoved crack beneath filler, or leaving the far wall unchecked. Each can produce a tidy exterior while preserving the defect that matters.
For a loaded Walking Floor or aggregate trailer, the next heavy cycle may be the next unloading operation. Schedule the permanent repair before that cycle, not after the temporary measure has become part of normal dispatch.
Tools, Materials, and Safety Checks
Have the inspection equipment and welding controls ready before dismantling the joint. A prepared bay prevents the crew from substituting whatever brush, filler, or gas happens to be nearby.
Stage the equipment and control the environment
Tooling and material checks for aluminum trailer crack repair
| Item | Purpose | Limit or note |
|---|---|---|
| Stainless brush for aluminum only | Remove oxide | Never shared with steel tools |
| Acetone and lint-free wipes | Degrease the joint | Clean beyond the intended weld preparation |
| Dye-penetrant kit | Confirm crack ends and final weld | Magnetic particle does not apply |
| 1/8-inch drill | Stop the crack tip under the specified procedure | Placement must follow the approved repair drawing |
| Filler matched to alloy | Sound weld metal | No general-purpose rod |
| Shielding gas, dew point -70°F or lower | Limit porosity | Welding-grade only |
| Preheat | Controlled heat | Only within the qualified procedure |
| Material staging | Avoid condensation | Allow material temperature to equalize before welding |
The -70°F or lower gas dew point is a porosity precaution discussed for 6061 aluminum in the AWS shielding and moisture-control discussion, which also recommends bringing aluminum into the welding area about 24 hours ahead to avoid condensation. Treat those as process controls, not a guarantee of a sound weld.
TIG can reduce porosity compared with conventional MIG in some applications, while helium-rich mixtures may improve penetration, according to TWI's aluminum porosity guidance. Choose the process around alloy, thickness, access, and the qualified procedure rather than appearance alone.
Make the trailer safe to work on
- Isolate energy. Lock out hydraulic and electrical sources, relieve stored pressure, and secure moving floor components.
- Support the unit. Use suitable supports before removing load-bearing parts or working underneath.
- Control exposure. Provide ventilation and eye, skin, and respiratory protection appropriate to the work.
- Remove ignition hazards. Let solvent evaporate fully and keep welding away from cleaning vapors and combustible residue.
Structural welding needs a qualified procedure under the applicable aluminum code framework and documented manufacturer or engineering approval where required.
Weld the Crack Out and Stop the Comeback Causes
These actions belong inside an approved repair procedure. Hole placement, groove shape, reinforcement, and weld sequence aren't universal dimensions that can be transferred to every aluminum rail.
The opening controls are material identification and accurate crack removal.
Remove the defect before rebuilding the joint
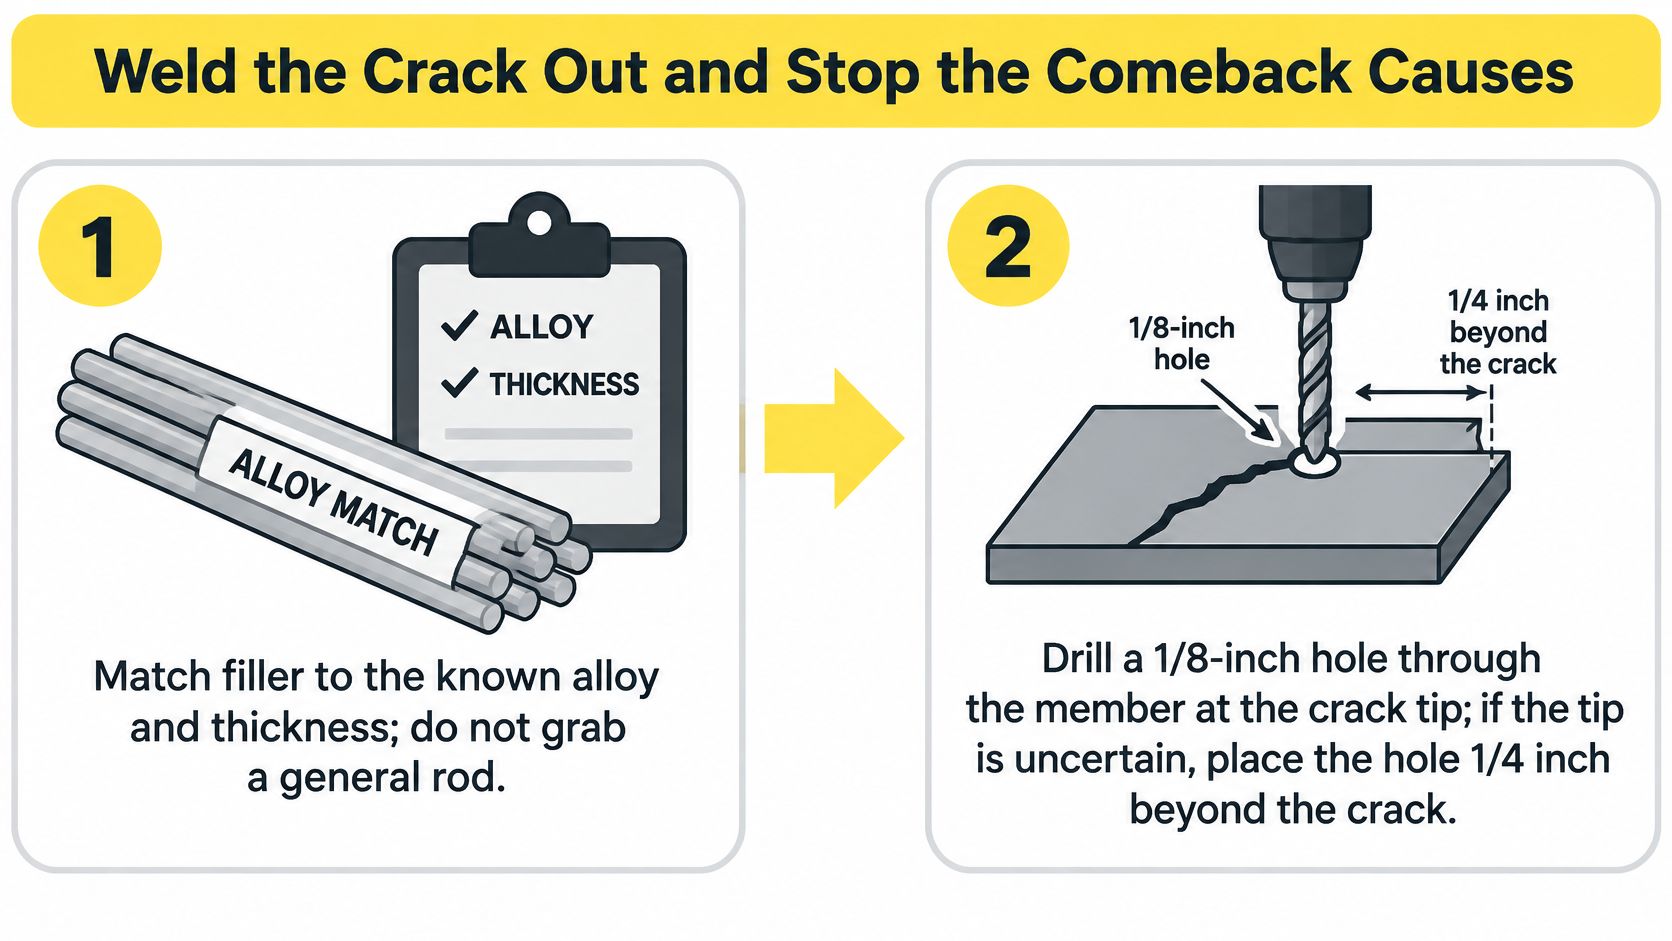
Match filler to the known alloy and thickness. Establish the base material and required joint properties before selecting wire or rod. Don't assume filler used successfully on a body panel is suitable for a structural extrusion.
Stop the tip only as the repair procedure specifies. A trailer-frame repair procedure published through NHTSA specifies a 1/8-inch hole at the crack tip, or 1/4 inch beyond the suspected endpoint when uncertain, followed by complete crack removal and a 1/8-inch root opening. Those are that document's dimensions, not a blanket aluminum repair specification; use them only when the responsible repair authority adopts them for the member.
Grind or gouge away the crack and any cracked weld. Work to sound metal without unnecessarily thinning the remaining section. Provide the access and root preparation needed for the specified weld, rather than cutting a shallow cosmetic groove.
Inspect the opened groove. Remove preparation debris and check for remaining indications. If a line continues into the root or adjacent wall, continue the approved removal process or stop for a revised repair disposition.
Degrease, remove oxide, and keep the joint clean. AWS aluminum storage and preparation guidance identifies acetone cleaning, a dedicated stainless-steel brush, clean filler, and preparation extending at least 1/2 inch on both sides of the joint; it also identifies AWS D1.2, Structural Welding Code, Aluminum, as the relevant structural framework. Remove grease before brushing so you don't work contamination into the surface, and weld promptly after preparation because oxide reforms.
Fit the designed reinforcement. Bring a sleeve or doubler into the specified contact without forcing a distorted member into position. Follow the approved taper, termination, attachment, and weld sequence; don't add weld because an edge is accessible.
Control heat rather than chasing a smooth bead
Apply only the permitted preheat. AWS root-fusion guidance states that standards allow aluminum preheat up to 250°F, but that isn't a target for every repair. The alloy, material condition, and welding procedure can impose tighter controls.
A heavy rail draws heat away while nearby thin sheet can distort. Balance travel speed, heat input, shielding, and interpass temperature instead of trying to cure poor preparation with more torch heat.
Make the specified penetration and protect starts and stops. Where the approved flange repair requires full penetration, achieve it through proper joint preparation and access. Use run-on or run-off provisions where specified rather than striking an arc on a critical frame edge.
Allow controlled cooling. Don't water-quench the repair to hurry the bay turnover. Keep the member supported and follow the procedure's restraint and cooling requirements.
Inspect the weld and surrounding structure. Perform visual and dye-penetrant examination as specified, then check alignment, reinforcement fit, and affected fasteners. Dress excessive weld geometry only where permitted, without reducing the required weld size.
A smooth bead can still contain porosity or incomplete fusion. A peer-reviewed study of 7005 aluminum cruciform welded joints modeled crack initiation at less than 7% of total fatigue life and found that welding residual stress reduced fatigue life in both initiation and propagation. That result isn't a remaining-life calculator for a trailer, but it reinforces why appearance alone isn't an acceptance test.
Use welding demonstrations as supporting context, not as the repair authority for your frame.
Remove the corrosion mechanism too
Where steel brackets or fasteners contact wet aluminum, galvanic attack can consume metal around holes and leave a crack starter. The Havasu Welding aluminum trailer repair guide connects these interfaces with corrosion-related damage.
Remove suspect hardware and examine the bracket footprint, not just the exposed perimeter. White deposits are a reason to investigate; measure the remaining section and look for pitting extending beyond the fracture.
Replace unsound parent metal rather than welding across a corroded edge. Use compatible isolation washers, barriers, or coatings as the joint design permits, and correct water traps without blocking intended drainage.
New bolts don't correct a wet, unisolated steel-to-aluminum interface.
After controlled return to loaded service, recheck weld toes, reinforcement ends, and fasteners. On Walking Floor equipment, also verify that the repaired support doesn't interfere with slat travel or hydraulic components. Keep salt removal, drainage checks, and interface inspection in the maintenance work order so the cause doesn't survive the weld.
Decide When the Trailer Goes to a Shop
Keep a repair in the yard only when your crew can establish the defect's scope, perform the approved work, and document acceptance. Send it to a shop when a primary rail or attachment is involved, the crack has returned, corrosion has consumed sound metal, or there's no suitable procedure for the alloy and thickness.
A welding machine and an available technician aren't enough. Access, fit-up, material identification, inspection capability, and the authority to release the structure all matter.
Budget for the complete job
Published prices from other businesses illustrate scope, not what your trailer will cost. Don't compare a small accessible body repair with a rail job requiring unloading, dismantling, fabrication, and structural review.
- Small aluminum welding work. In 2025, Arc Tech Enterprises advertised a $200 starting price and stated that most repairs were completed within 24 hours.
- Mobile aluminum repair. In 2026, KC Ironcore listed a $150 minimum for aluminum trailer, boat, and equipment repairs and stated that aluminum work cost about 35% more than mild-steel repairs.
- Frame and structural work. In 2026, OCRV Center listed trailer frame and structural welding repairs at $750–$20,000 or more, typically requiring 5–80 hours.
Use those published figures to understand why scope drives downtime, then obtain a job-specific estimate. The estimate should identify inspection, crack removal, replacement material, reinforcement fit-up, welding, testing, and any engineering or manufacturer disposition.
Send a useful repair package
Provide photographs from both faces, the defect map, material information, prior repair history, and loading or unloading symptoms. Identify any slats, hydraulic lines, brackets, or guards that restrict access.
At Brothers Truck Trailer Repair and Welding Corp., we offer aluminum welding for truck and trailer bodies and components, custom fabrication, and truck and trailer parts supply. Our welders have specialized aluminum expertise, and we specialize in Walking Floor repair and maintenance, including hydraulic diagnosis and damaged slat replacement.
That combination matters when a floor-support crack sits beside moving slats and hydraulic equipment. Treat the structural defect and the surrounding system as one repair scope, rather than releasing the trailer with a sound weld and an unresolved interference or support problem.
We provide aluminum welding for truck and trailer bodies and components, along with Walking Floor system repair and maintenance. Visit Brothers Truck Trailer Repair and Welding Corp. to discuss your crack location, previous repair, and operating symptoms before a temporary stop-drill becomes an unfinished permanent repair.

Standard trailer ball sizes with rated capacities, SAE load classes, torque values and a fit checklist so you match ball, shank and coupler correctly.
Trailer brake inspection steps, pushrod limits, pressure specs and pass-fail criteria for fleets and owner-operators, with the checks most often missed.
Single axle car trailers explained: real payload figures, tandem axle comparison, load placement and a pre-trip inspection checklist for owners and fleets.