Preventive Maintenance for Commercial Trailers
In the 2024 International Roadcheck, inspectors placed 7,930 vehicle combinations out of service in the United States. Defective service brakes accounted for 26.5% of vehicle out-of-service violations, while tires accounted for 22.1%, meaning two basic, inspectable systems represented nearly half of the cited defects (Commercial Vehicle Safety Alliance 2024 Roadcheck results).
That matters to every fleet manager who has watched a trailer miss a load because a repair was discovered too late. For Tampa Bay operators hauling waste, recycling, aggregate, and construction materials, heat, humidity, salt air, abrasive cargo, and uneven loading can accelerate wear. Preventive maintenance for commercial trailers isn't paperwork overhead. It's the difference between a controlled shop visit and a roadside shutdown that disrupts drivers, customers, and delivery schedules.
Table of Contents
- Why Preventive Maintenance for Commercial Trailers Matters
- Building Your Trailer Inspection Checklists and Intervals
- Walking Floor and Aluminum Trailer Maintenance Tasks
- Parts Inventory and Record-Keeping That Hold Up
- Troubleshooting Triggers and Risk-Based Repair Decisions
- Putting Your Tampa Bay Trailer Maintenance Program Together
Why Preventive Maintenance for Commercial Trailers Matters
A trailer usually shows warning signs before a failure stops the load. Brake adjustment drifts. A tire loses pressure. An air hose rubs against a bracket. A wheel-end component begins generating excess heat. A Walking Floor system may unload unevenly before the floor stops moving. Each symptom gives the maintenance team time to intervene, provided the defect is recorded, assigned, and checked after the repair.
Enforcement data should set the first priorities. During the 2024 campaign, CVSA-certified inspectors conducted 42,332 inspections in the United States, including 24,232 Level I inspections, 9,955 Level II inspections, and 8,145 Level III inspections. They identified 11,675 vehicle violations. Defective service brakes led the vehicle out-of-service categories with 3,093 violations, followed by tires with 2,577 violations (CVSA's 2024 inspection findings).
Start with the defects that stop the trailer
A generic checklist weights every item equally; a maintenance program built around enforcement risk does not. Brakes, tires, air-system integrity, coupling hardware, and wheel-end condition should receive the earliest attention because a failure in any of these areas can block dispatch or create a serious roadside safety exposure.
For Tampa Bay operators hauling waste, recycling, aggregate, and construction materials, the schedule must match the trailer's work and environment. Heat, humidity, salt air, abrasive cargo, impacts, and uneven loading expose different weaknesses. Local fleets can also use Spanish-language trailer repair information when coordinating service with their teams.
- Waste and recycling trailers: Check for contamination, impact damage, hydraulic leaks, worn slats, and structural fatigue.
- Aggregate and construction trailers: Inspect abrasion zones, load-contact areas, suspension components, tires, wheels, frames, and welds.
- Regional trailers: Track repeated brake, lighting, tire, and coupling defects by route rather than waiting for an annual inspection to reveal the pattern.
- Aluminum trailers: Examine panels, rails, welds, fasteners, and corrosion-prone areas before a small crack becomes a structural repair.
A daily walk-around can reveal visible damage, low tire pressure, damaged lights, loose connections, and obvious air leaks. It will not reliably confirm brake adjustment, internal hydraulic contamination, developing frame cracks, or a wheel-end problem that appears only under load. Those findings require shop access, measurements, testing, and a technician who understands the operating conditions. Record the trailer number, defect location, operating symptom, date, and repair status so the next shift knows what remains open.
Practical rule: Use roadside enforcement data to set the inspection order, then use your own defect history to set the interval.
The goal is planned repair, not the elimination of normal wear. Moving work into a scheduled shop window gives the fleet time to source parts, assign labor, arrange replacement equipment, and return the trailer to service before a roadside or loading-dock failure makes the decision for you.
Building Your Trailer Inspection Checklists and Intervals
A trailer maintenance schedule works best when it separates three jobs. Drivers check visible condition before operation and report defects. Maintenance technicians handle inspections that require access, measurements, adjustment, or testing. The carrier also completes the required periodic inspection for each trailer segment at least once every 12 months.
Start the checklist with defects most likely to create a roadside enforcement problem: brakes, tires, wheels, coupling equipment, lighting, and load security. Follow that order during the walk-around, then add trailer-specific items such as hydraulic equipment, suspension, frame condition, and aluminum structure.
For non-passenger commercial motor vehicles covered by 49 CFR 396.11, a written post-trip Driver Vehicle Inspection Report (DVIR) is required when a defect or deficiency is found or reported that could affect safe operation or cause mechanical breakdown. No written DVIR is required when no defect or deficiency is found or reported, although carrier policy may still require a daily record. Separate intermodal-equipment rules and other applicable exceptions must be considered. The report should identify the vehicle and the affected components, including service brakes, trailer brake connections, parking brakes, steering, lighting, tires, coupling devices, wheels, and rims. Before the vehicle is operated again, the carrier must repair safety-related defects and certify that the listed defect was repaired or that repair is unnecessary. Retain the DVIR and the required repair and driver-review certifications for three months (FMCSA DVIR requirements).
Build the schedule around the work
A driver's check should be quick enough to complete every time and precise enough to guide the next person. “Trailer checked” leaves the shop guessing. “Left rear outside tire low, air added, recheck required” identifies the location, action, and open follow-up.
Use this schedule as a starting point. Shorten the interval when heavy loads, high mileage, corrosion, severe weather, or repeated defects increase the risk.
| Component Group | Inspection Frequency | What to Verify |
|---|---|---|
| Brakes and trailer brake connections | Every pre-trip inspection, plus periodic shop inspection | Brake response, air leaks, hoses, gladhands, adjustment, actuators, slack adjusters, linings, drums, and rotors |
| Tires, wheels, and hubs | Every pre-trip inspection, plus periodic shop inspection | Inflation, tread, sidewall damage, wheel condition, fasteners, seals, hub condition, and abnormal heat |
| Coupling devices and cargo security | Every pre-trip inspection and after coupling or load changes | Locking condition, kingpin and coupling hardware, safety connections, doors, tie-down points, and load-contact areas |
| Lighting and wiring | Every pre-trip inspection, with focused periodic checks | Lamps, connectors, harness routing, corrosion, reflectors, and damaged mounting points |
| Suspension, frame, and underbody | Periodic shop inspection, and after heavy impact or unusual loading | Hangers, springs, air-suspension components, crossmembers, frame rails, cracks, corrosion, and loose hardware |
| Walking Floor hydraulics and floor structure | Before operation, during scheduled service, and after unloading symptoms | Hoses, fittings, cylinders, valves, reservoir, filters, slat travel, fasteners, floor bed, frame, and welds |
| Complete periodic inspection | At least once every 12 months for each trailer segment | Applicable minimum inspection standards and the documented condition of required systems |
The annual inspection supports the daily reporting process. It does not replace it. Carriers must retain the periodic-inspection report for 14 months, and current inspection documentation must remain on the vehicle (FMCSA periodic inspection requirements).
Adjust for Tampa Bay conditions
Calendar intervals can miss local operating stress. Tampa Bay heat can expose weak tires, seals, wiring, and hydraulic components. Humidity and salt air accelerate corrosion at connectors, fasteners, aluminum panels, weld areas, and underbody structures. Trailers working near the coast or in wet, contaminated loading environments need more frequent checks of lighting, wiring, corrosion points, and connections than a clean linehaul unit on the same calendar.
Brake inspections must follow the full actuation path. Federal requirements address actuators, slack adjusters, linings, pads, drums, rotors, tubing, hoses, hose assemblies, and gladhand connectors, not only friction-material thickness (FMCSA brake-system requirements). A lining-only check can miss a leaking hose, seized adjuster, damaged connector, or worn drum.
Document the trailer number, defect location, operating symptom, date, repair status, and person who closed the work. That record supports compliance and gives the next shift a clear handoff. Move confirmed repairs into scheduled shop time whenever possible, so parts, labor, replacement equipment, and return-to-service checks are arranged before a roadside or loading-dock failure forces the schedule.
Walking Floor and Aluminum Trailer Maintenance Tasks
Walking Floor defects can create a high roadside and delivery risk when they affect hydraulic control, floor movement, or structural integrity. Maintenance starts before the floor moves. Look for contamination, leaks, misalignment, damaged slats, and frame problems while the trailer is empty, before a loaded unit reaches a customer without repair support.
Use a controlled hydraulic routine
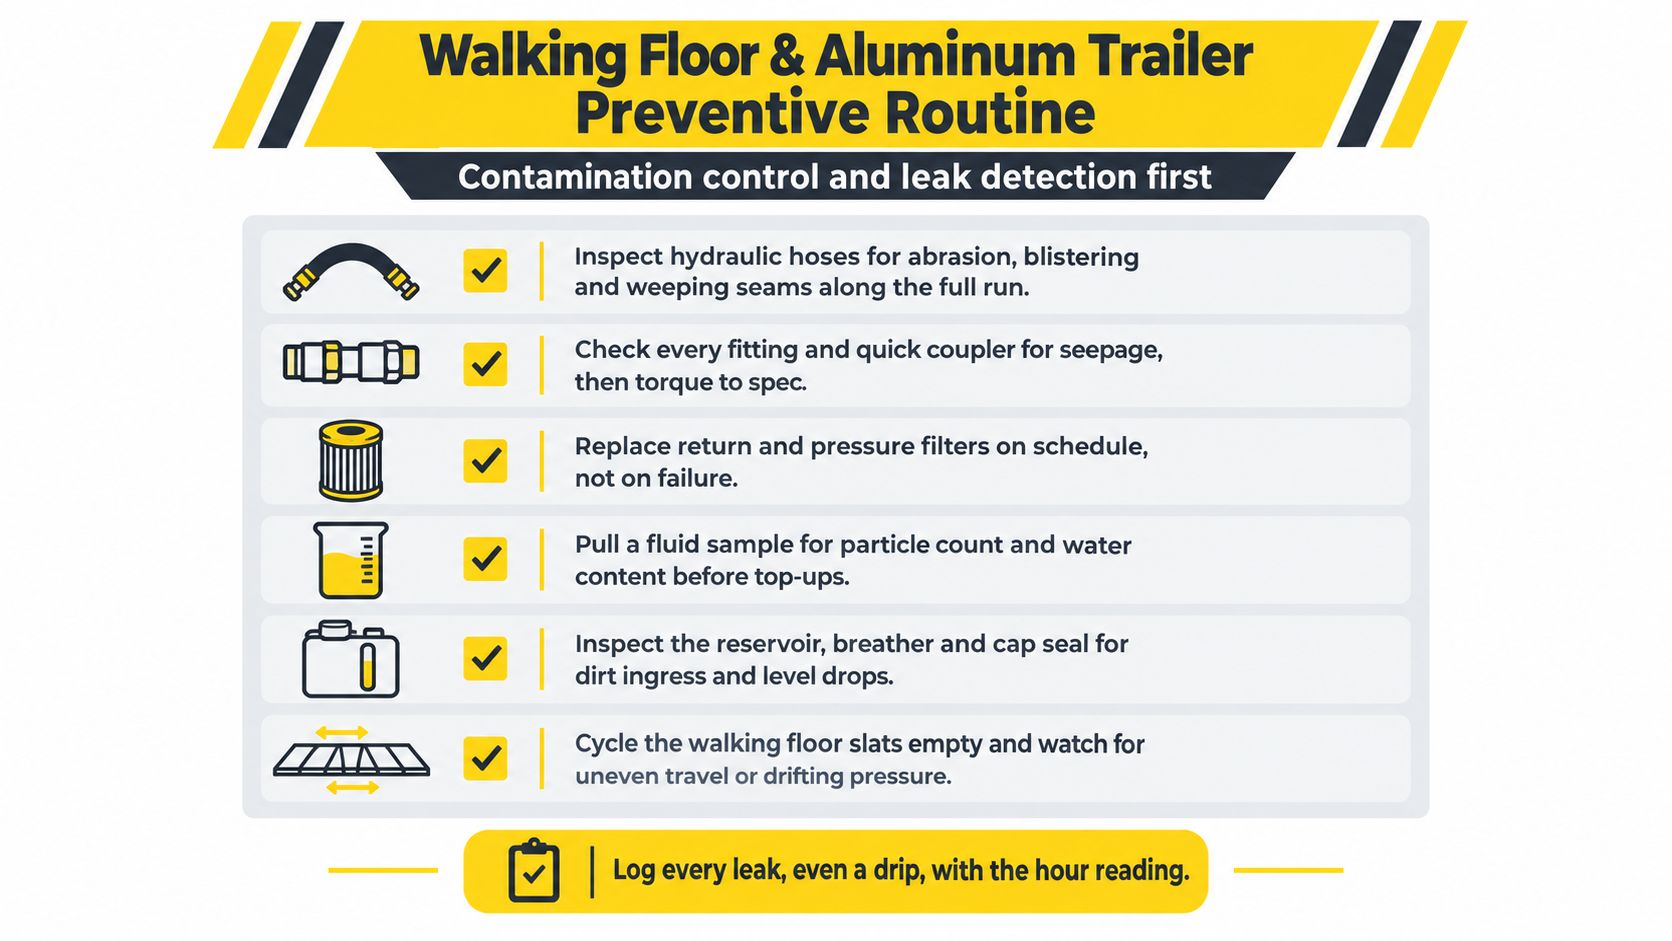
Inspect the complete hydraulic circuit, not just the pump and reservoir. Check hoses for abrasion, fittings for seepage, cylinders for leaks, valve blocks for contamination or damage, guards for contact points, the breather, cap seal, and fluid level. Clean each connection before opening the circuit. Dirt introduced during a hose or fitting repair can damage valves and cylinders later.
Use this service sequence:
- Inspect before starting. Record hose condition, fitting leaks, cylinder condition, valve-block damage, guard clearance, reservoir level, breather condition, and cap-seal condition.
- Control contamination. Clean around every connection before disassembly. Sample or replace fluid according to the component manufacturer's cleanliness and viscosity requirements.
- Cycle the floor unloaded. Watch for hesitation, uneven slat travel, abnormal noise, drifting movement, and unstable pressure.
- Test with a representative load under controlled conditions. Compare loaded and empty operation, noting heat, pressure, cycle time, and delayed movement.
- Inspect the floor and structure. Document slat wear, fasteners, floor-bed damage, frame condition, and weld cracking.
- Repair the cause. Replacing slats will not correct restricted flow, contaminated valves, cylinder bypass, misalignment, bent slats, or excessive friction.
Slow unloading identifies a symptom, not the failed component. Several faults can produce the same behavior, so the work order should record cycle behavior, pressure, leak recurrence, component hours, and whether the problem appears empty, loaded, or in both conditions. A defect affecting safe operation or reliable unloading deserves shop time before the next dispatch, rather than repeated roadside troubleshooting.
Treat aluminum as a structural material
Aluminum panels and rails can crack around load-contact areas, fasteners, corners, impact points, and previous repairs. Corrosion may weaken a repair zone or hide damage beneath dirt and residue. During periodic service, clean these areas enough to separate surface contamination from cracking or material loss, then rank damage around load paths and attachment points above cosmetic panel damage.
Aluminum repair requires decisions about alloy, heat input, preparation, contamination, distortion, and the structural role of the damaged area. A patch can look sound while fatigued surrounding material continues to carry the defect. The repair must restore the load path, not just cover the visible opening.
Use a shop experienced in corrosion-resistant aluminum welding and trailer fabrication for body damage, structural cracks, and custom alterations. Record the trailer number, damage location, repair method, material used, technician, and post-welding inspection. That detail supports compliance reviews and gives the next shift a clear handoff.
Parts Inventory and Record-Keeping That Hold Up
A trailer can be ready for dispatch on paper and still lose a shift because the replacement part is missing or the repair history is unclear. Build the inventory and records around the defects most likely to create roadside trouble, repeat downtime, or a failed handoff.
Keep regularly used brake components, gladhand connectors, air hoses, lighting parts, seals, and Walking Floor slat hardware available when the fleet's trailer mix justifies them. Group stock by trailer type and fitment. Similar-looking parts can have different dimensions, ratings, or connection details, so the shelf label should identify the applicable trailer, component, and part number.
Separate fast-moving service parts from items that need workshop support. Specialty hydraulic components, structural aluminum material, unusual suspension parts, and fabrication supplies can consume cash and storage space if kept for every possible failure. Set a clear sourcing rule: stock what can stop a dispatch today, and route uncommon repairs through a dependable shop or supplier with the right inventory.
A fleet can use this commercial truck and trailer parts catalog to match common components with an active repair. The parts record should show the trailer identification, component location, part number, quantity, supplier, and installation date. Those details prevent a technician from ordering the correct-looking part for the wrong trailer.
Make every defect traceable
FMCSA lists roadside inspection reports, vehicle maintenance files, annual inspection reports, DVIRs, repair receipts, and accident reports among the records used in safety oversight (FMCSA vehicle maintenance guidance). Keep those records organized so a manager can show what was found, what was repaired, and whether the trailer returned to service. They also give the next driver a reliable answer about a previous defect.
A defensible record links three stages:
- Driver observation: The DVIR records the symptom, location, operating condition, and whether the issue affects safe operation. “Hydraulic problem” is too vague. Note whether unloading slowed, stopped, or behaved unevenly.
- Technician diagnosis: The work order identifies the failed component or confirmed cause, inspection measurements, parts used, labor performed, and unresolved restrictions.
- Verification: A post-repair check confirms the defect is corrected. Include technician sign-off, test conditions, and the return-to-service decision.
Walking Floor records should state whether testing occurred empty or loaded, whether slats traveled evenly, whether pressure changed, whether reservoir level dropped, and whether fluid was present outside the system. This separates a recurring hydraulic fault from an operating condition that only appears under load.
For aluminum trailers, record the panel or rail location, damage type, nearby fasteners, previous repair history, and final inspection result. The goal is a usable shift handoff, not a generic “repaired” note. Over time, consistent records help the fleet manager spot repeat failures, parts with short service lives, and trailer defects that deserve a planned engineering or fabrication review.
Troubleshooting Triggers and Risk-Based Repair Decisions
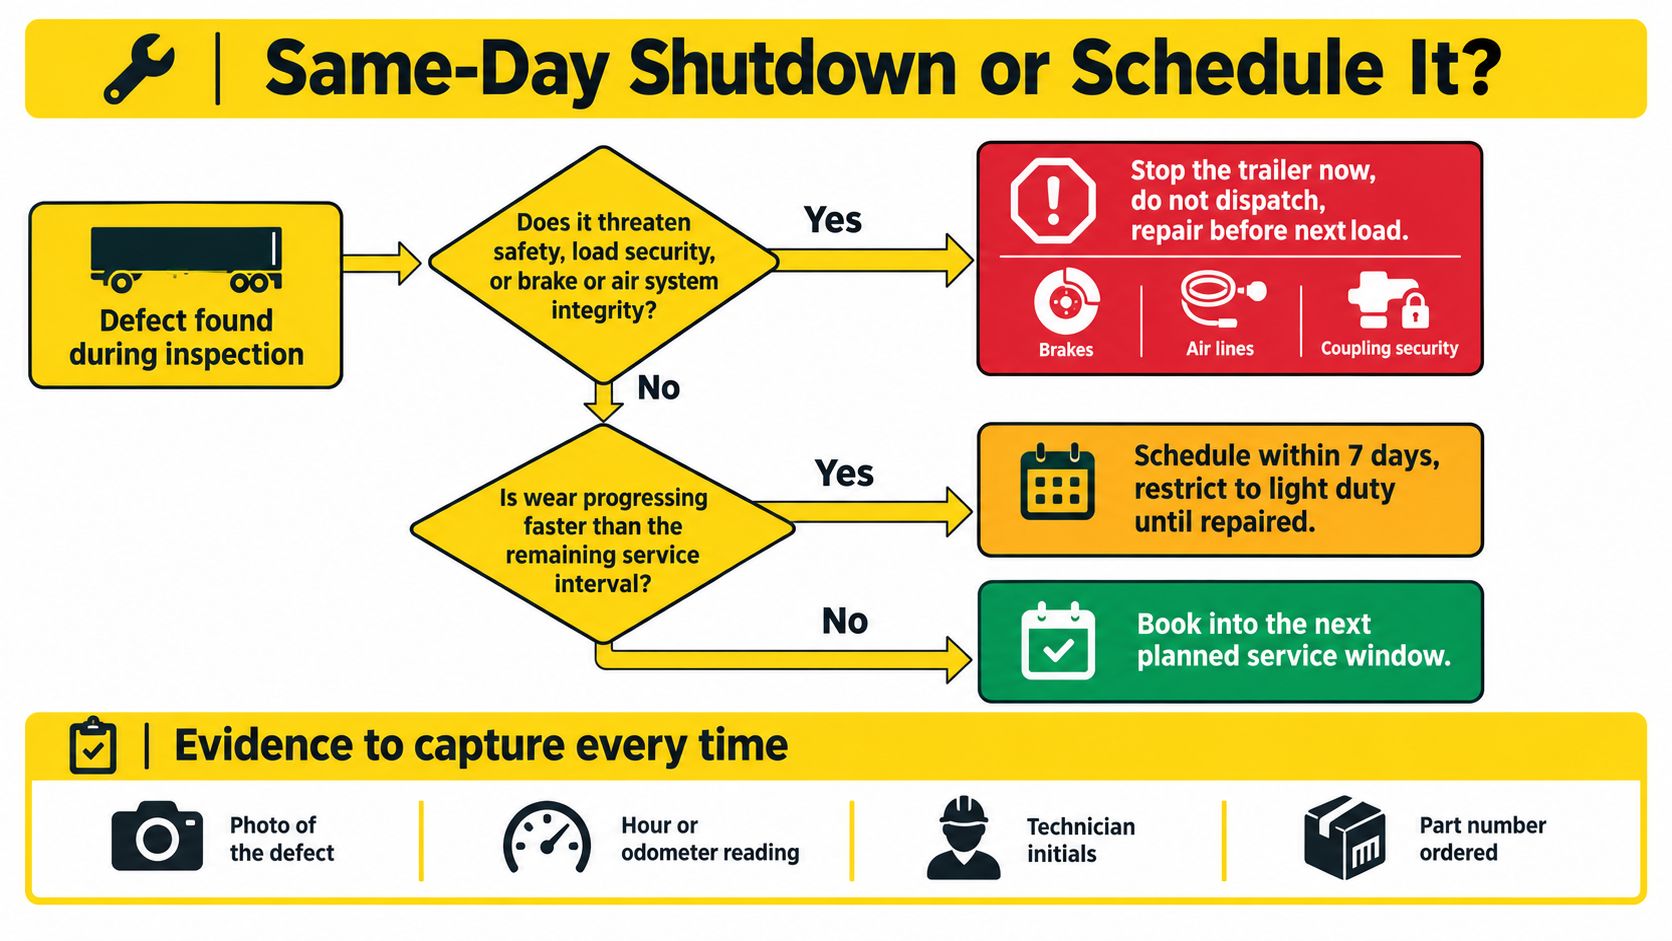
A trailer inspection only protects the fleet when the defect leads to a clear decision. Drivers, dispatchers, technicians, and managers should follow the same path after a problem appears. Record the component, symptom, severity, mileage, load type, and recurrence, then decide whether the trailer stops, enters a short repair window, or goes into planned service.
Use three repair categories
Stop and repair before dispatch. Remove the trailer from service when a defect threatens braking, air-system integrity, coupling security, tire safety, load security, or structural integrity. Examples include a significant air leak, a brake problem affecting operation, a tire below the applicable legal tread threshold, damaged coupling hardware, or a cracked structural aluminum weld.
Restrict and schedule quickly. Some defects have not created an immediate safety failure but are getting worse under the trailer's normal route or load. A recurring hydraulic leak, increasingly uneven Walking Floor travel, developing corrosion, or a suspension defect that has not yet affected safe operation belongs in a defined repair window. Set that window using route, load, weather exposure, and the next available shop time.
Book into planned service. Cosmetic damage, nonurgent hardware replacement, and stable wear items can wait when they do not threaten safety or load security. Assign an owner and due date. “Monitor” alone is not a decision. State the next inspection, operating restriction, or repair point so the defect does not disappear during a shift handoff.
Brake and tire findings deserve tighter controls because they appear frequently in roadside enforcement records. The 2021 FMCSA violation summary listed 113,386 clamp- or roto-type brake out-of-adjustment violations, 70,584 flat-tire or audible-air-leak violations, 69,656 tires below the 2/32-inch tread threshold, and 44,629 inoperative or defective-brake violations (FMCSA Pocket Guide 2021 violation summary). These counts show where inspection effort deserves priority, not the probability that a particular trailer will fail.
Define the evidence before closing the work order
A work order should let another person identify the defect, the repair, and the return-to-service decision:
- Defect location and symptom: Name the axle, wheel position, hydraulic circuit, slat section, weld, panel, rail, or coupling component.
- Operating context: Record mileage, load type, loaded or unloaded condition, and whether the issue has occurred before.
- Correction: List the adjustment, repair, replacement, fabrication, or diagnostic test performed.
- Verification: Complete a post-repair inspection, road test when appropriate, and technician sign-off.
- Parts trail: Record the part number ordered and installed, especially for repeat wear components.
For fleet benchmarking, track defects per 10,000 trailer miles and repeat defects per 100 inspections. If either measure rises for two consecutive periods, review the component, operating conditions, inspection method, and repair quality. The trend does not prove the cause, but it shows when the current maintenance approach is failing to control a recurring problem.
Putting Your Tampa Bay Trailer Maintenance Program Together
Discipline sets the program. Standardize the DVIR, require a clear defect description, assign an owner to every open repair, and make the technician close the loop with signed verification. Technology can support that process, but it cannot replace a missed inspection or an incomplete repair record.
Set intervals by operating severity and roadside-enforcement risk. Walking Floor units hauling waste or recycling need documented hydraulic checks, controlled cycle tests, slat and fastener inspections, and structural reviews. Aggregate and construction trailers need focused checks of tires, brakes, suspension, load-contact areas, frame members, and welds. Tampa Bay heat, humidity, and salt exposure may justify shorter corrosion and electrical intervals when defect history shows recurring failures.
Keep a direct workshop relationship with Brothers Truck Trailer Repair and Welding Corp. for aluminum welding, hydraulic troubleshooting, fabrication, structural repair, and other work requiring specialized equipment. Stocking common parts can shorten repair delays. Direct communication also gives the fleet manager a clear handoff between diagnosis, approval, repair, and return to service.
Take these three actions this week:
- Audit current DVIR compliance. Check whether drivers record symptoms clearly and whether safety-related defects receive documented repair or certification.
- Book outstanding annual inspections. Confirm that every trailer segment has current inspection documentation and that reports are retained correctly.
- Test one Walking Floor trailer. Record an unloaded cycle, operating behavior, pressure changes, visible leaks, slat travel, and structural condition before its next loaded route.
Guiding principle: Inspect what enforcement data shows fails most often, then tailor the interval to what your trailers do every day.
Brothers Truck Trailer Repair and Welding Corp. provides commercial truck and trailer maintenance, Walking Floor diagnostics and hydraulic repairs, aluminum welding, fabrication, inspections, and parts support for Tampa Bay operators. Visit Brothers Truck Trailer Repair and Welding Corp. to discuss a documented maintenance plan before the next surprise breakdown.

Expert commercial trailer repair in Tampa for Walking Floor, aluminum welding, and fleet maintenance. Minimize downtime with Brothers Truck Trailer Repair.
Master walking floor trailer hydraulic troubleshooting with expert diagnostics, safety protocols, and repair strategies to minimize fleet downtime.
Source the right folding wagon replacement parts with our fitment guide. Learn to measure frames, match wheel brackets, and verify tube dimensions.