How to Load Trailer
You're staged in a yard before daylight, forklift idling, driver waiting on paperwork, and dispatch already asking for an ETA. That's exactly when a bad load gets built. Knowing how to load a trailer correctly isn't about filling space until the doors close. It's about proving the weight, placement, and securement will hold through hard braking, a tight Tampa Bay ramp, and a roadside inspection.
Table of Contents
- What Every Loader Should Check Before Touching the Deck
- Reading the Trailer's Weight Ratings the Right Way
- Planning Weight Distribution and Center of Gravity
- Matching Tie-Downs to the Forces They Must Resist
- Securing Different Cargo Types and Trailer Styles
- Pre-Trip Walk-Around and the First 50 Miles
- When Loading Reveals a Trailer That Needs Attention
What Every Loader Should Check Before Touching the Deck
I see the same start to most loading problems. The trailer backs in, the crew opens the doors, and freight starts moving before anyone checks whether the unit should be loaded at all. Slow down for five minutes. A defect you find empty is a work order. The same defect found loaded is a missed pickup and a reload.
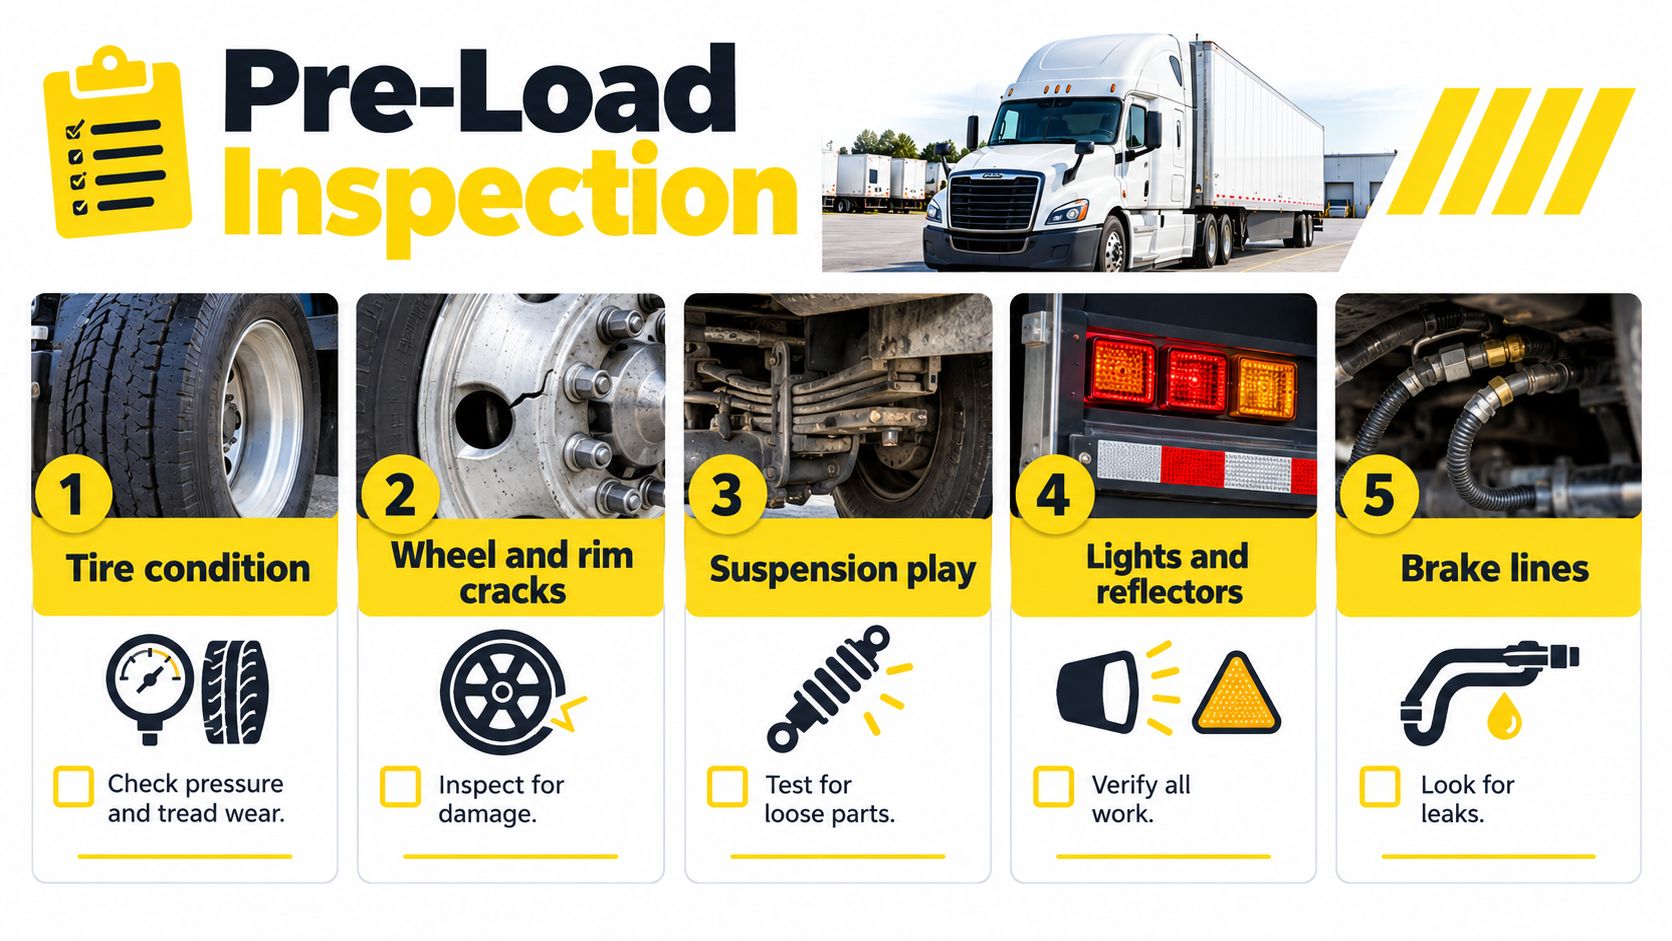
Run The Outside First
Walk the unit the same way every time so you don't skip steps when you're rushed.
- Tires and wheels: Check pressure, tread, sidewall damage, cracked rims, loose lugs, and leaking hubs.
- Suspension and brakes: Look for broken springs, shifted airbags, loose components, chafed hoses, and air leaks.
- Coupling and landing gear: Confirm the kingpin or pintle is fully engaged, the gear handles freely, and the trailer sits level.
- Lights and reflectors: Verify brake, turn, marker, and license lights work before departure becomes your problem.
Then Check The Loading Surface
Open and close the doors or tailgate through their full travel. Look for bent hinges, misaligned latches, cracked floor sections, loose boards, damaged aluminum, and hydraulic leaks. Sweep out debris from the last load. A wet, oily, or dented floor reduces friction and changes how cargo stacks, slides, and braces, so the same trailer might need a different plan than it needed last week.
Yard rule: If you'd reject it on a roadside inspection empty, don't bury the defect under freight.
Reading the Trailer's Weight Ratings the Right Way
Gross weight is the number everybody asks about, and it's often the wrong first question. You need the whole rating stack, because the lowest limit in that stack controls the legal load. A trailer can be under its gross vehicle weight rating and still overload an axle, a tire, or the coupling.
Start at the data plate. Read GVWR, each gross axle weight rating, tire size and load range, and the kingpin or pintle rating. Then subtract the trailer's actual tare weight. Don't use a brochure weight if the unit has gained equipment over the years. Tarp systems, toolboxes, spare tires, hydraulic components, and Walking Floor equipment all consume payload.
Trailer Rating Stack at a Glance
| Rating | What it limits | Where to find it | Common fleet mistake |
|---|---|---|---|
| GVWR | Total trailer and cargo weight | Data plate | Treating it as payload |
| GAWR | Weight carried by each axle group | Data plate | Loading legal gross with one axle over |
| Tire load range | Weight each tire can carry at proper pressure | Tire sidewall | Matching tire size but not capacity |
| Kingpin or pintle rating | Vertical and towing load at coupling | Plate or manufacturer data | Assuming the tractor hookup makes it legal |
For a typical dry van, your payload is what's left after you subtract tare from GVWR, then check that the placement doesn't push the tandems or drives over their individual limits. Run the same math on a Walking Floor trailer, but account for the added floor system and any onboard hydraulics before you promise payload. The trailer length doesn't create capacity. The ratings and the scale ticket do.
Before cargo is staged, verify the trailer's gross vehicle weight rating, axle ratings, tire capacity, floor condition, and available payload as part of the controlled loading sequence described in Texas cargo securement guidance. That order matters because you can't fix an impossible payload with clever placement.
Axle overloads are not a technicality. They overheat tires, stress suspension parts, lengthen braking distance, and draw citations even when total weight looks fine. If the numbers only work by perfect placement with no margin, reduce the load or choose another trailer.
Planning Weight Distribution and Center of Gravity
Don't start with floor space. Start with each item's weight, dimensions, and center of gravity, then build a placement plan on paper before the forklift moves. The load plan should tell the operator what goes in first, what sits over the axles, what stacks, and what stays at floor level.
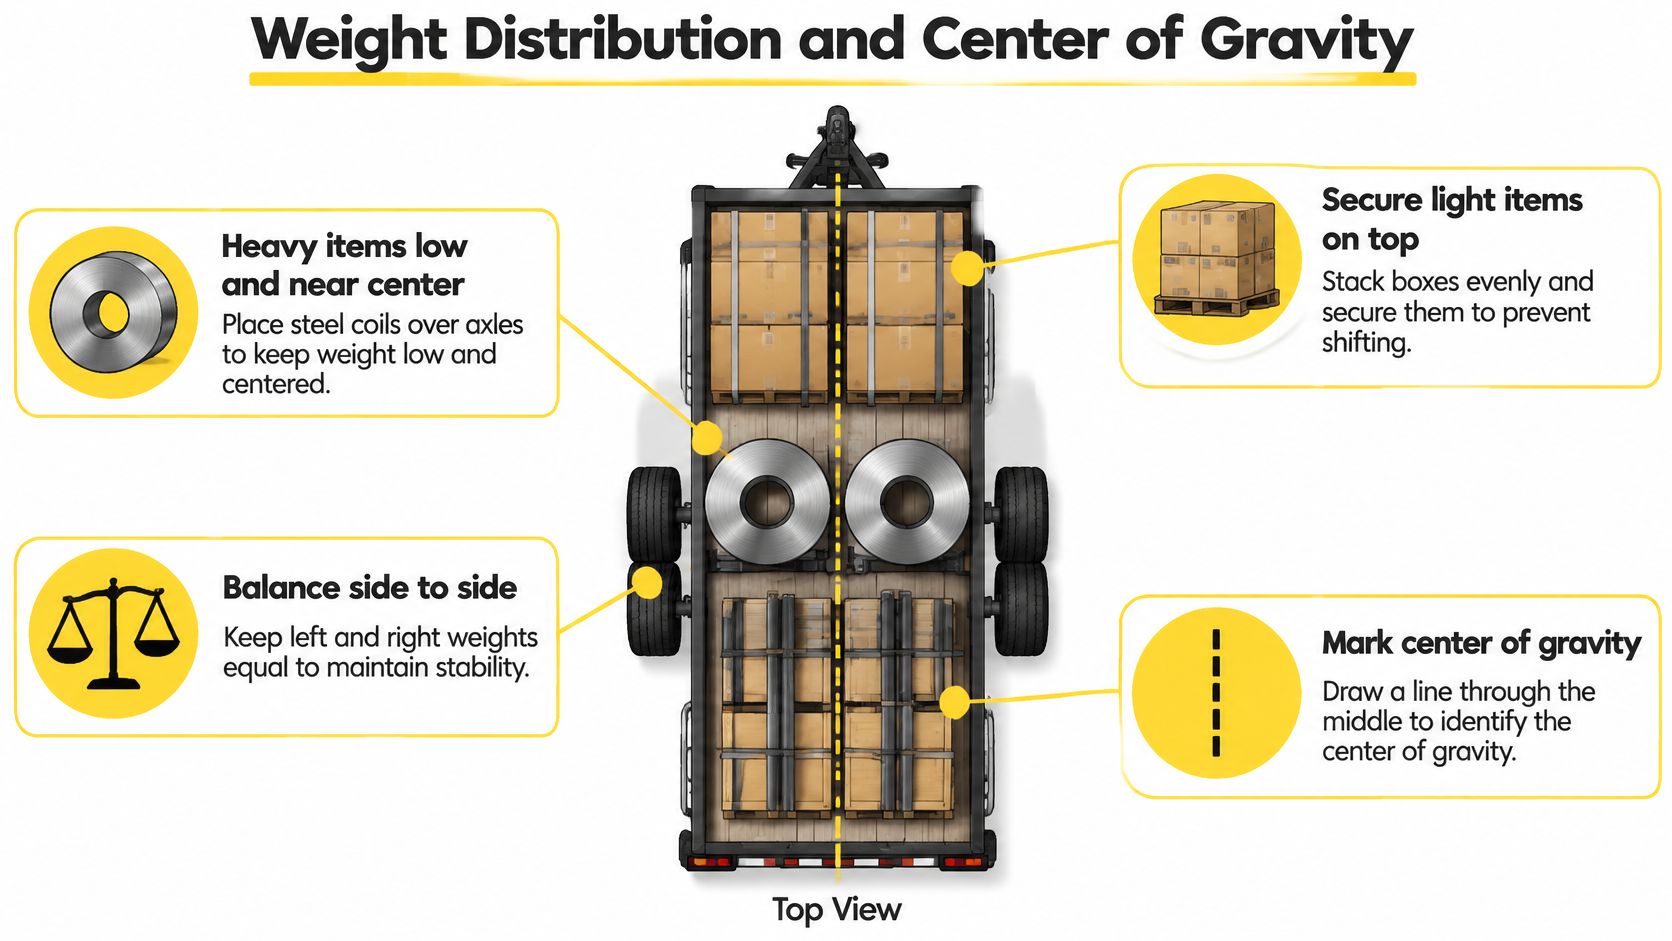
Place the heaviest cargo low and near the trailer's longitudinal center. Balance it side to side so one set of tires and suspension components isn't doing the other side's work. Avoid concentrating weight between or behind the axles, where it can reduce steering traction or create sway even under legal gross.
Stack For Stability, Not Convenience
Heavier pieces go on the bottom and lighter freight goes above, forming a stable, broad based stack where the cargo allows it. That lowers the combined center of gravity and reduces toppling during cornering. Don't stack heavy freight on crushable cartons just to save floor space, and don't leave tall, narrow stacks without bracing.
For towed trailers, use approximately 10 to 15% of the combined trailer load at the hitch as your practical tongue weight benchmark, while staying within the manufacturer's tongue weight and axle limits. Too little weight forward encourages sway. Too much can overload the coupling and unload the tow vehicle's front axle, hurting steering and braking.
Load by axle weight and center of gravity, not by cubic space. A trailer that looks half full can already be out of capacity.
Walking Floor and aggregate loads follow the same physics. Load material evenly across the floor so discharge doesn't pull harder on one side, strain hydraulics, or accelerate uneven slat and bearing wear. If a driver reports the trailer pulling to one side or unloading unevenly, don't assume the floor system failed first. Check whether the loading pattern has been feeding it a crooked load for months.
Fill voids before you secure anything. Rated blocking, dunnage, load bars, and compatible friction material keep freight from gaining momentum inside the trailer. Momentum is what turns a small gap into damaged cargo and bent doors.
Matching Tie-Downs to the Forces They Must Resist
Tie-downs aren't the last step. They're engineered against forces the load will see on the road, not the still air of your yard.
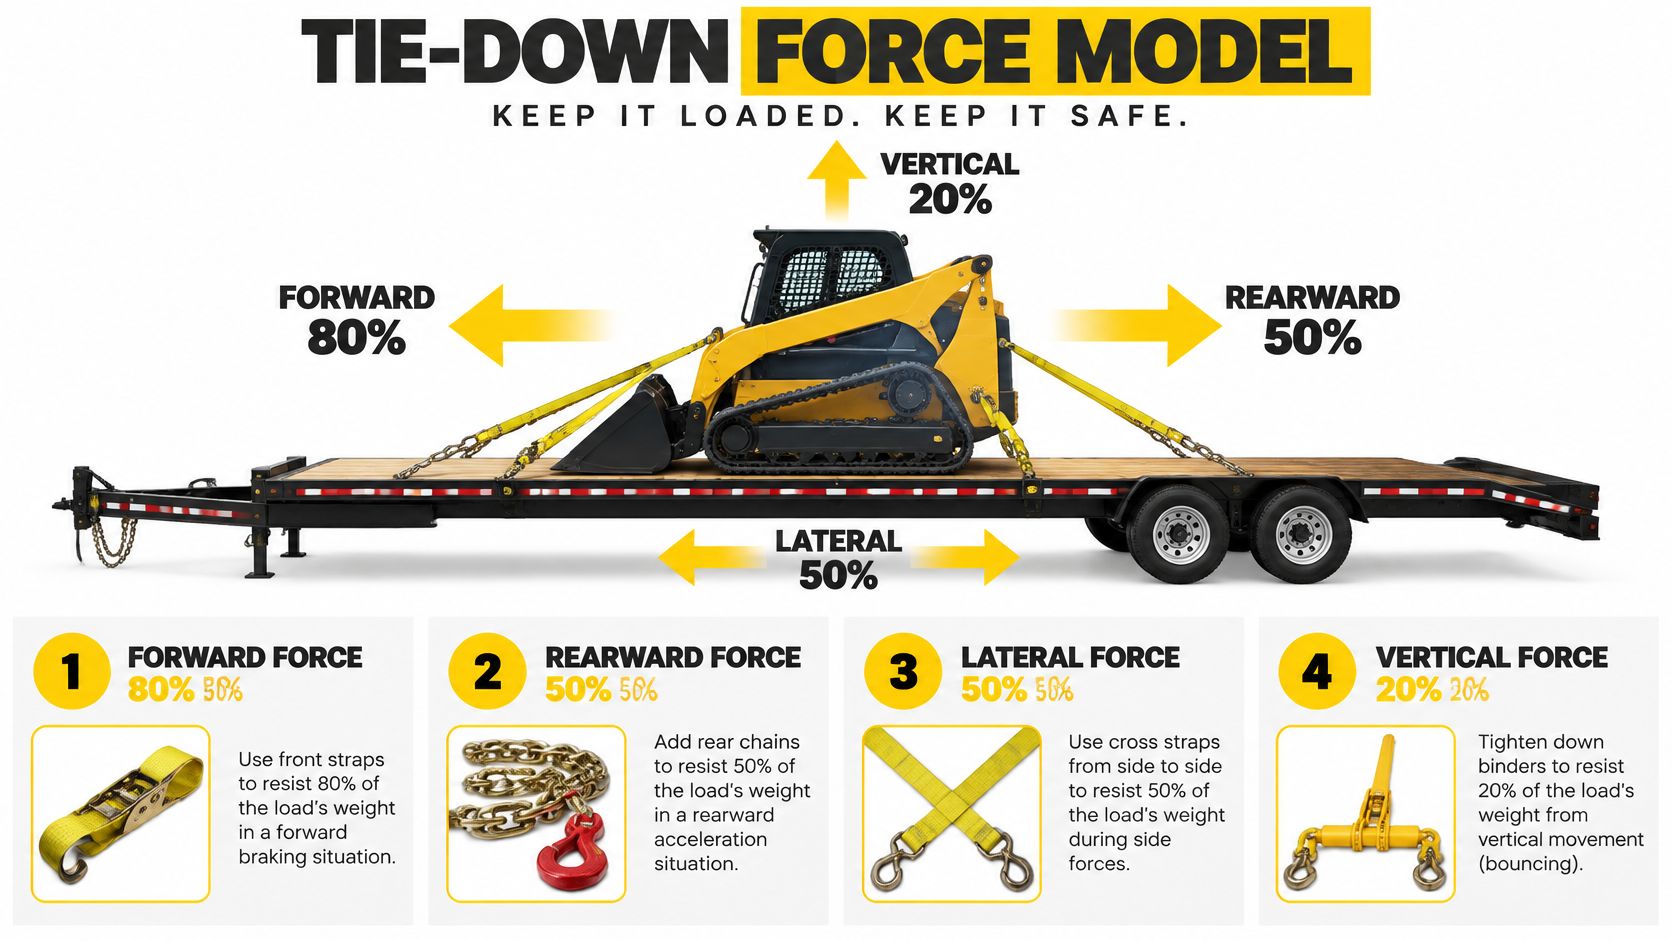
Commercial cargo systems are generally required to resist 80% of cargo weight forward, 50% rearward, 50% laterally, and 20% vertically, representing hard braking, acceleration or reverse movement, turning, and bumps or hill crests, under the FMCSA cargo securement performance framework. Forward resistance deserves the most respect because braking is the violent event every load will eventually face.
Do The Working Load Limit Math
The aggregate working load limit of the tie-downs and other securement components must be at least 50% of the weight of the article or group of articles, so a 10,000 pound load requires at least 5,000 pounds of combined working load limit, according to the FMCSA cargo securement rules for interstate commercial vehicles. Add the tagged limit of each assembly in the system. Don't count a strap, chain, binder, hook, or anchor at more than its rated limit, and don't count damaged equipment at all.
Minimum Securement by Load Weight
| Cargo weight | Min. aggregate WLL (50%) | Typical tie-down count | Forward force target (80%) |
|---|---|---|---|
| 10,000 lb example | 5,000 lb | Enough rated assemblies to reach the total | 8,000 lb equivalent |
| Your load | Cargo weight multiplied by 0.50 | Add assemblies until tagged limits meet the total | Cargo weight multiplied by 0.80 |
Choose chain where abrasion, sharp edges, or heavy equipment make webbing vulnerable. Choose synthetic web straps where surface protection and even tension matter, then protect them with edge protectors at every corner that can cut fibers. Inspect for cuts, deformation, corrosion, damaged hooks, and missing labels. Never use knots as a substitute for proper tensioning, and never anchor to weak rub rails or unrated points.
Attach restraints symmetrically where the cargo allows it, block forward and rearward movement separately, and tension firmly without crushing the freight. If you can't explain your WLL math to an inspector in under a minute, the system isn't ready.
Securing Different Cargo Types and Trailer Styles
Palletized freight, steel, machinery, and loose bulk material don't fail the same way, so they shouldn't be secured the same way. Match the method to how the cargo can move.
Here's a look at mixed freight being placed, where position and contact matter before any strap goes tight:
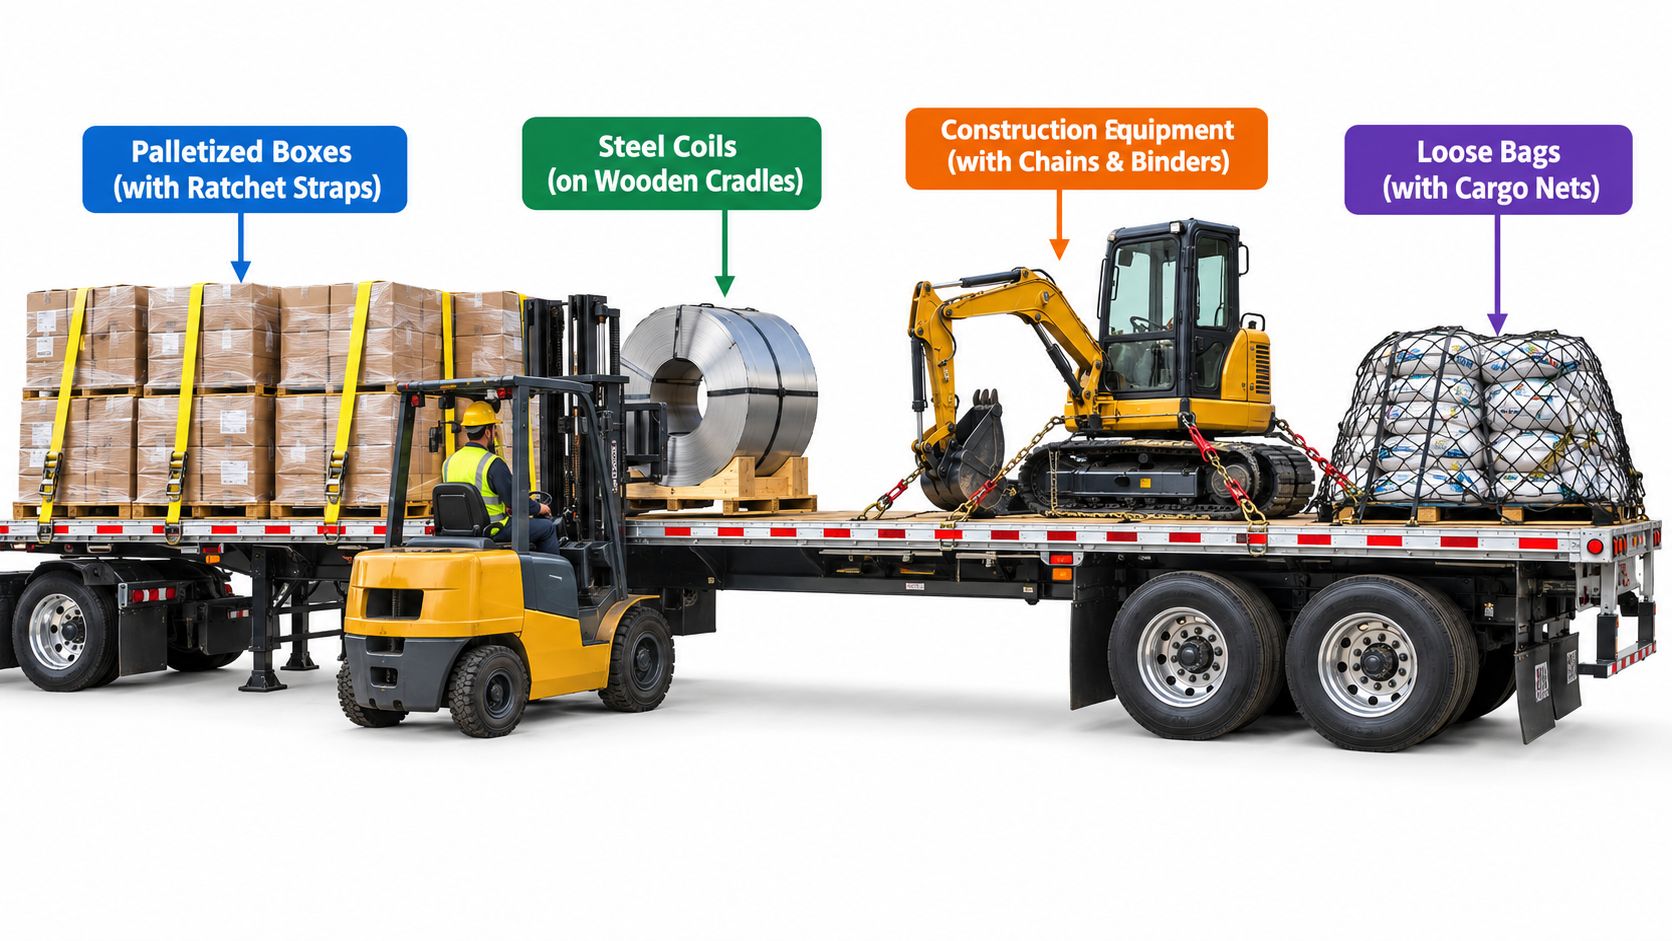
- Palletized general freight: Build tight rows, brace the nose, fill side gaps, and use load bars, straps, or bracing inside enclosed trailers. Closed doors aren't internal restraint.
- Steel coils and paper rolls: Use proper cradles, blocking, and securement that controls rolling as well as sliding. Round freight needs shape control before tension.
- Construction equipment: Lower attachments, use rated machine tie-down points, and pull against movement in every direction with suitable chain and binders.
- Loose waste, recycling, and aggregate: Keep material contained below the body structure as designed, confirm door seals and latches hold, and check that the load can't leak, spill, or blow out.
Where Blocking Does The Real Work
Straps excel at holding cargo down and together, but blocking and bracing stop it from starting to move. Use sound dunnage, secure it so it can't walk out, and make sure friction material suits both the cargo and the floor. Smooth steel on smooth aluminum behaves differently than crated freight on wood, so don't copy yesterday's method without checking contact surfaces.
Watch this loading walkthrough and compare the placement sequence with your own crew's habits:
On a Walking Floor trailer, inspect slats, drive components, and hydraulic lines before loading. Worn slats, seeping fittings, or a floor that doesn't cycle cleanly can turn a contained load into an in transit failure. Catch it empty, while you can still repair it without digging freight off the floor.
Pre-Trip Walk-Around and the First 50 Miles
Most crews treat the walk-around as a formality after the hard work. I treat it as the last chance to prove the load, because the yard is flat, quiet, and forgiving in ways the highway isn't.
Start at the nose and work door to door. Confirm coupling engagement, air and electrical connections, landing gear position, tire condition, door or tailgate latches, ramps, gates, covers, and tarp hardware. Check that nothing can leak, spill, fall, blow off, or shift. Push and pull what you safely can, check strap tension, and look underneath for hanging securement or leaking cargo.
The Recheck Is Part Of Loading
Drivers must inspect cargo and securement devices within the first 50 miles, with additional checks after three hours or 150 miles and whenever duty status changes, as part of the federal secure your load inspection practice summarized by NHTSA. That first stop matters because vibration settles pallets, seats blocking, and exposes strap slack that looked fine on smooth concrete.
NHTSA reports crashes involving roadway objects kill approximately 850 people and injure nearly 19,000 people each year in the United States, and passenger vehicles account for 73% of vehicles involved. That reality defines the audience for your walk-around. A loose board or cover doesn't stay a fleet problem once it leaves the trailer.
Plan the first safe recheck location before you leave. If the driver has to improvise the stop, the stop often doesn't happen.
The recurring roadside findings are predictable. Crews rely on tarp weight instead of straps, use weak rails as anchors, leave gaps around irregular freight, and forget upward movement on rough pavement. Catch those four, recheck after settling, and you'll prevent most of the shifting loads we later see as bent doors and damaged floors.
When Loading Reveals a Trailer That Needs Attention
Good loading exposes weak equipment. A forklift tire finds the soft floor. A door that won't align under a normal load points to hinge, frame, or body damage. Hydraulic seepage shows up when a Walking Floor is cycled after loading, and hairline cracks around welds start to open once the deck carries weight.
Don't write those signs off as age. Loose or missing D-rings, cracked crossmembers, spongy floors, leaking fittings, worn slats, and doors that need a shoulder to latch all reduce the load you can safely defend. Pull the unit out before a roadside failure makes that decision for you.
Aluminum cracks and structural damage call for proper welding and fabrication, not a cosmetic patch over a stressed joint. Walking Floor problems call for system diagnostics that check hydraulics, slats, and drive performance together. Fixing the weakest structural point restores more than appearance. It restores the rating assumptions behind your next load plan, your schedule, and your safety margin.
When a pre-load inspection turns up cracked aluminum, a damaged floor, worn Walking Floor slats, or hydraulic trouble, bring the unit to a Tampa shop that can handle the repair and get the trailer back under load. Visit Brothers Truck Trailer Repair and Welding Corp. for Walking Floor diagnostics and repair, aluminum welding, fabrication, trailer repair, maintenance, and in stock parts support for Tampa Bay fleets and owner-operators.
Weight of Utility Trailer. Learn utility trailer weight ranges, payload calculations, tongue load, axle limits, and permit checks for safer fleet operations
Plan truck and trailer maintenance in Tampa with practical inspection, brake, Walking Floor, aluminum repair, and parts checks to reduce avoidable downtime.
Practical guide to semi trailer tail lights covering types, FMVSS No. 108 requirements, wiring basics, troubleshooting, and step-by-step replacement procedures.