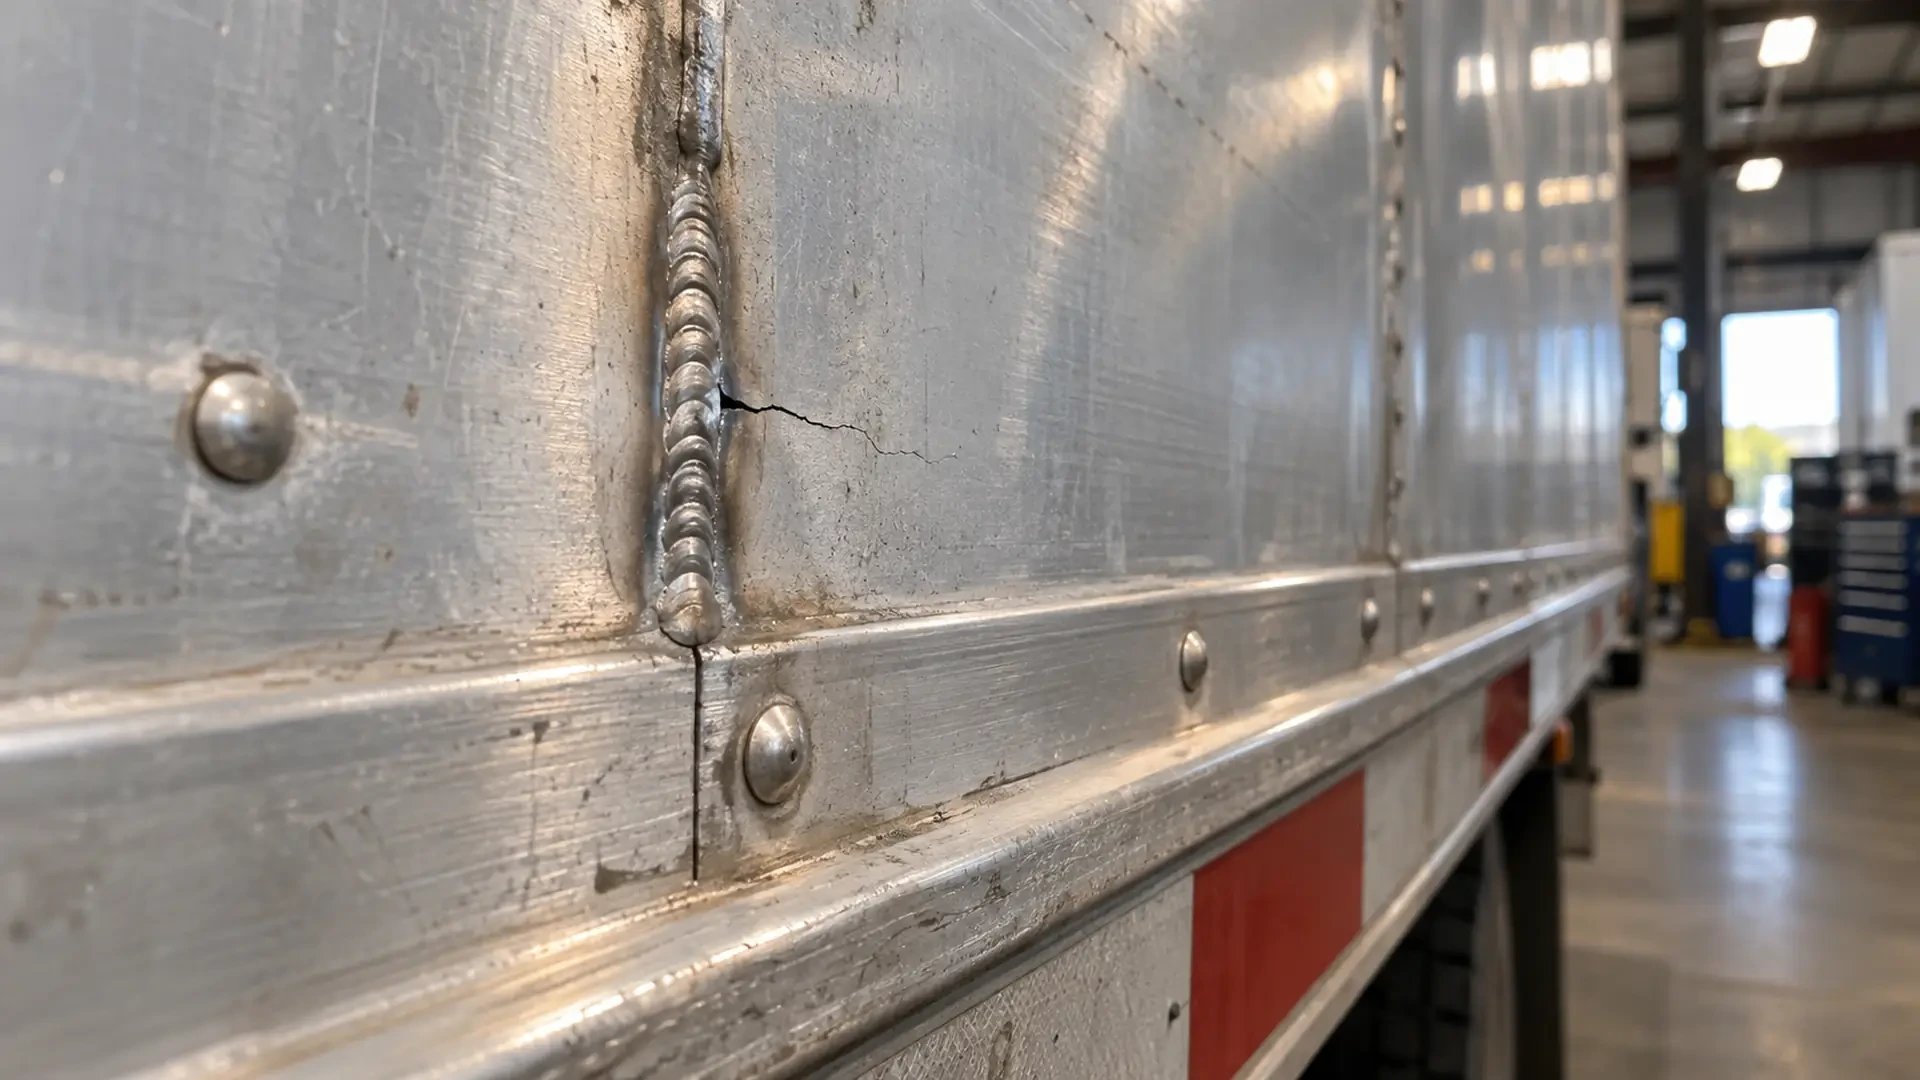
Trailer crack near a previous weld: what to record before repair
A new line beside an earlier weld deserves more context than one close-up photo. The visible crack may be related to movement, contact, deformation or another condition in the surrounding area, but its position alone does not confirm why it appeared.
The useful first step is to document what changed without labeling the cause. Repair history, wide photos and a clear timeline give a trailer repair shop a better starting point for an in-person inspection.
Brothers Truck Trailer Repair and Welding Corp. provides trailer repair, aluminum welding and fabrication from its workshop at 1620 S 51st St, Tampa, FL 33619.
A previous weld is part of the history, not the diagnosis
When damage appears near an existing weld, it is easy to conclude that the earlier repair failed. That conclusion may be incomplete. A new line can appear in the weld, beside it or farther into the surrounding material, and each location provides different information for inspection.
The area may also have been exposed to changed alignment, repeated flexing, rubbing, impact or an operating condition that was not visible when the earlier work was completed. A photograph cannot determine which possibility applies.
Describe the relationship precisely:
The line is in the weld bead.
The line begins at one end of the weld.
The line is beside the weld in the base material.
A gap, bend or raised edge is visible beyond the repaired area.
Fresh rubbing, residue or a polished mark appears nearby.
These observations help define what should be inspected. They do not assign fault or establish the final repair method.
Record the earlier repair information you actually have
You do not need a complete technical file to make the history useful. Gather the facts that are available and identify anything that is uncertain.
Useful details include:
Approximate date of the earlier repair.
Trailer identification and affected side or section.
Reason the area was repaired at that time.
Photos taken before or after the earlier work, if available.
Whether the trailer returned to normal operation afterward.
Date the new line or change was first noticed.
Any maintenance or operating event recorded between the two observations.
If you do not know the material, welding process or previous repair scope, say so. An accurate “unknown” is more useful than a technical guess.
Take photos that show the crack in context
Start with a location view
Take one image far enough back to show where the area sits on the trailer. Include stable references such as a panel edge, seam, floor section, corner, fastener line or opening. The goal is to let someone understand the location before looking at the detail.
Add a medium view of the complete repaired area
The second image should include the entire existing weld and the nearby material. Do not crop out the ends of the weld, an adjacent seam or a visible change in shape. Those surrounding features may help the shop decide what must be examined in person.
Capture the visible line from more than one safe angle
Use good light and keep the camera parallel to the surface for one image. A second angle may help show a raised edge, separation or deformation that disappears in a straight-on view.
Do not climb into an unstable position, crawl under an unsupported trailer or operate moving equipment to obtain a photo. Document only what can be observed safely.
Include a size reference without touching the damage
If practical, place a common reference near the area without covering, flexing or probing the crack. A ruler in the same plane can help show scale. Avoid marking directly on the damaged material unless the repair shop asks you to do so.
Compare what changed around the weld
A recurring crack is not the only relevant change. Review the larger area and note observable differences such as:
A seam that looks wider or less even than before.
A panel or floor section that appears raised, bowed or displaced.
A new contact mark between adjoining surfaces.
Missing finish, metal residue or fresh polishing.
A fastener line that no longer appears uniform.
A sound, vibration or movement change that began near the same time.
If you have an older photo from a similar angle, keep both files. A side-by-side comparison may show progression more clearly than memory alone.
Do not create a new load condition or operate a damaged system solely to reproduce the symptom. If the change was noticed during normal work, record the conditions that already existed.
Build a short, factual timeline
A useful timeline can fit in a few lines:
When the earlier repair was completed.
What normal operation looked or felt like afterward.
When the new line was first observed.
Whether its length, shape or surrounding area changed.
What the trailer was doing when each change was noticed.
Whether operation, sound, alignment or contact changed at the same time.
Use dates when possible. If the exact date is unknown, use a practical reference such as “during the first unloading cycle on Tuesday” or “found during the weekly walk-around.”
Avoid changing the evidence before inspection
Cleaning loose dirt for visibility may be reasonable when it can be done safely, but aggressive grinding, drilling, heating, straightening or covering the area can change what the shop needs to inspect. A temporary cosmetic change can also hide the ends of a crack or the pattern around it.
Before attempting a repair, contact the shop and explain what you see. The next step may depend on the material, access, location, trailer construction and surrounding condition.
What an in-person inspection may need to consider
The final scope cannot be selected from a photo. Depending on the trailer and location, an inspection may consider:
The visible crack and its endpoints.
The earlier weld and adjacent material.
Deformation, alignment or contact around the area.
Access needed for preparation and repair.
Nearby components or moving sections.
Repair history and changes in operation.
Whether a broader trailer, fabrication or Walking Floor service question is involved.
This is why a request framed as “please inspect a new crack beside a previous weld” is more useful than “reweld this line.” It describes the need without assuming the solution.
Prepare a clear service request
Use this structure when contacting the Tampa workshop:
Trailer identification: year, make, model or unit number available.
Location: exact side and section of the visible damage.
Repair history: approximate date and reason for the prior weld.
Current observation: where the new line appears in relation to that weld.
Timeline: when it was found and whether it changed.
Operating context: loaded, empty, parked, loading, unloading or in transit when noticed.
Related changes: sound, movement, rubbing, gap or alignment.
Visuals: location, medium and detail photos.
Requested next step: inspection and discussion of the appropriate repair path.
This information cannot replace a physical evaluation, but it can make the first conversation more focused.
See a new crack near a previous trailer weld? Contact Brothers Truck Trailer in Tampa with the unit information, repair history, timeline and safe wide photos you have. Call +1 (813) 750-6380 or email [email protected] to discuss the next step for an in-person inspection.

Expert commercial trailer repair in Tampa for Walking Floor, aluminum welding, and fleet maintenance. Minimize downtime with Brothers Truck Trailer Repair.

Preventive maintenance for commercial trailers: inspection checklists, Walking Floor care, aluminum repairs, and fleet service in Tampa Bay.
Master walking floor trailer hydraulic troubleshooting with expert diagnostics, safety protocols, and repair strategies to minimize fleet downtime.